Chapter 12. Input/Output Facilities
In this chapter, we continue our exploration of the Java API by
looking at many of the classes in the java.io and java.nio packages. These
packages offer a rich set of tools for basic I/O and also provide the
framework on which all file and network communication in Java is
built.
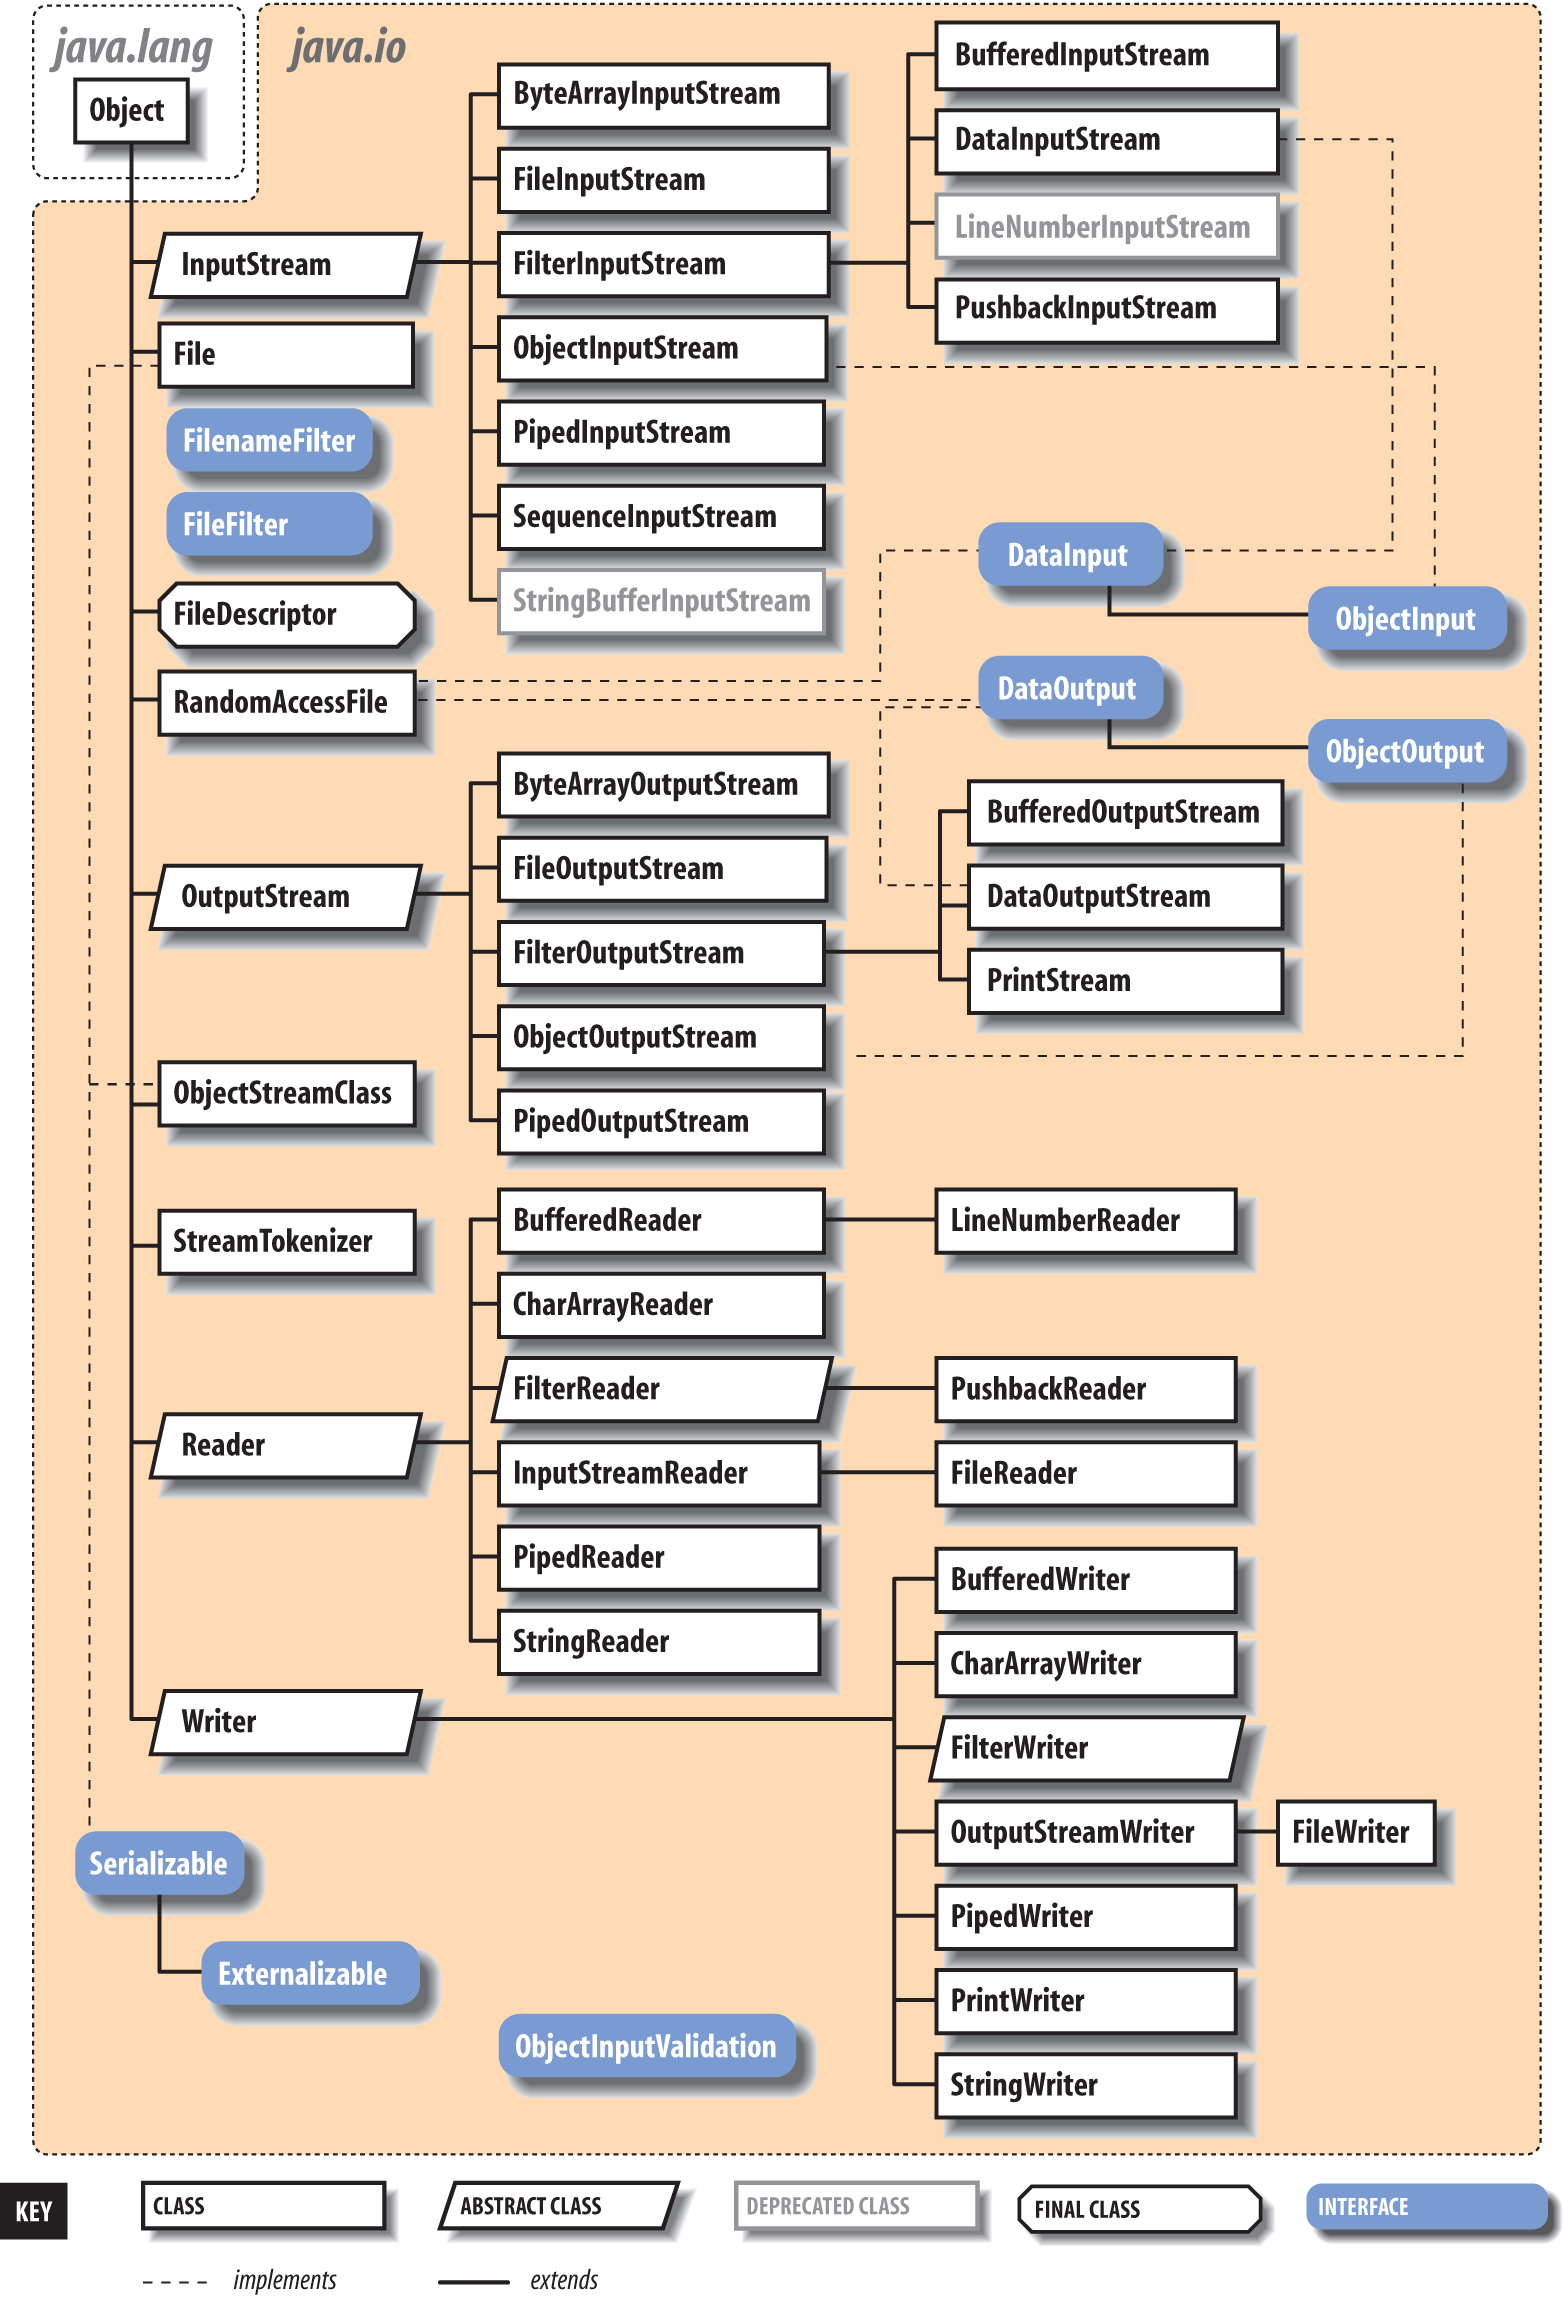
Figure 12-1 shows the class hierarchy of these packages.
We’ll start by looking at the stream classes in java.io, which are subclasses of the basic
InputStream, OutputStream, Reader, and Writer classes. Then we’ll examine the File class and discuss how you can read and write
files using classes in java.io. We also
take a quick look at data compression and serialization. Along the way,
we’ll also introduce the java.nio
package. The NIO, or “new” I/O, package (introduced in Java 1.4) adds
significant functionality tailored for building high-performance services
and in some cases simply provides newer, better APIs that can be used in
place of some java.io features.
Streams
Most fundamental I/O in Java is based on
streams. A stream represents a flow of data with (at
least conceptually) a writer at one end and a
reader at the other. When you are working with the
java.io package to perform terminal
input and output, reading or writing files, or communicating through
sockets in Java, you are using various types of streams. Later in this
chapter, we’ll look at the NIO package, which introduces a similar concept
called a channel. One difference betwen the two is
that streams are oriented around bytes or characters while channels are
oriented around “buffers” containing those data types—yet they perform
roughly the same job. Let’s start by summarizing the available types of
streams:
InputStream,OutputStreamAbstract classes that define the basic functionality for reading or writing an unstructured sequence of bytes. All other byte streams in Java are built on top of the basic
InputStreamandOutputStream.Reader,WriterAbstract classes that define the basic functionality for reading or writing a sequence of character data, with support for Unicode. All other character streams in Java are built on top of
ReaderandWriter.InputStreamReader,OutputStreamWriterClasses that bridge byte and character streams by converting according to a specific character encoding scheme. (Remember: in Unicode, a character is not a byte!)
DataInputStream,DataOutputStreamSpecialized stream filters that add the ability to read and write multibyte data types, such as numeric primitives and
Stringobjects in a universal format.ObjectInputStream,ObjectOutputStreamSpecialized stream filters that are capable of writing whole groups of serialized Java objects and reconstructing them.
BufferedInputStream,BufferedOutputStream,BufferedReader,BufferedWriterSpecialized stream filters that add buffering for additional efficiency. For real-world I/O, a buffer is almost always used.
PrintStream,PrintWriterSpecialized streams that simplify printing text.
PipedInputStream,PipedOutputStream,PipedReader,PipedWriter“Loopback” streams that can be used in pairs to move data within an application. Data written into a
PipedOutputStreamorPipedWriteris read from its correspondingPipedInputStreamorPipedReader.FileInputStream,FileOutputStream,FileReader,FileWriterImplementations of
InputStream,OutputStream,Reader, andWriterthat read from and write to files on the local filesystem.
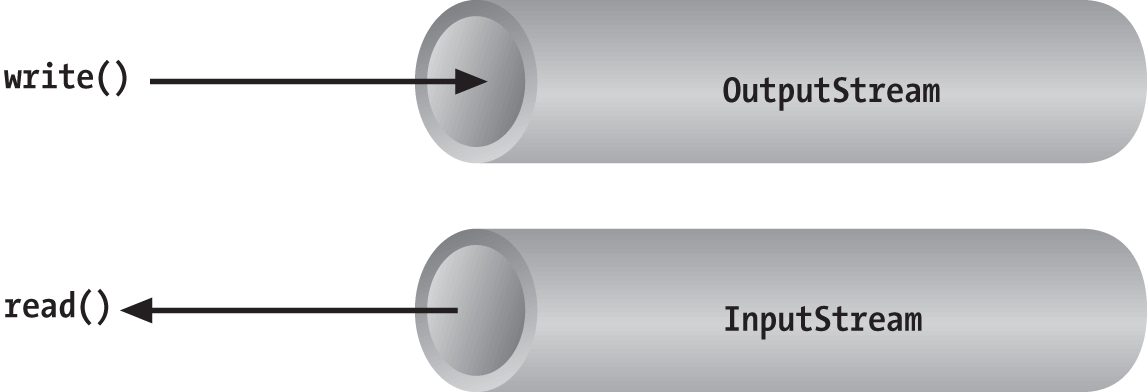
Streams in Java are one-way streets. The java.io input and output classes represent the
ends of a simple stream, as shown in Figure 12-2. For bidirectional conversations,
you’ll use one of each type of stream.
InputStream and
OutputStream are
abstract classes that define the lowest-level
interface for all byte streams. They contain methods for reading or
writing an unstructured flow of byte-level data. Because these classes are
abstract, you can’t create a generic input or output stream. Java
implements subclasses of these for activities such as reading from and
writing to files and communicating with sockets. Because all byte streams
inherit the structure of InputStream or
OutputStream, the various kinds of byte
streams can be used interchangeably. A method specifying an InputStream as an argument can accept any
subclass of InputStream. Specialized
types of streams can also be layered or wrapped around basic streams to
add features such as buffering, filtering, or handling higher-level data
types.
Reader and Writer are very much like
InputStream and OutputStream, except that they deal with
characters instead of bytes. As true character streams, these classes
correctly handle Unicode characters, which is not always the case with
byte streams. Often, a bridge is needed between these character streams
and the byte streams of physical devices, such as disks and networks.
InputStreamReader and OutputStreamWriter are special classes that use
a character-encoding scheme to translate between
character and byte streams.
This section describes all the interesting stream types with the
exception of FileInputStream, FileOutputStream, FileReader, and FileWriter. We postpone the discussion of file
streams until the next section, where we cover issues involved with
accessing the filesystem in Java.
Basic I/O
The prototypical example of an InputStream object is
the standard input of a Java application. Like
stdin in C or cin in C++, this is the source of input to a
command-line (non-GUI) program. It is an input stream from the
environment—usually a terminal window or possibly the output of another
command. The java.lang.System class,
a general repository for system-related resources, provides a reference
to the standard input stream in the static variable System.in. It also
provides a standard output stream and a
standard error stream in the out and err variables,
respectively.[34] The following example shows the correspondence:
InputStreamstdin=System.in;OutputStreamstdout=System.out;OutputStreamstderr=System.err;
This snippet hides the fact that System.out and System.err aren’t just OutputStream objects, but more specialized and
useful PrintStream objects. We’ll
explain these later, but for now we can reference out and err
as OutputStream objects because they
are derived from OutputStream.
We can read a single byte at a time from standard input with the
InputStream’s read() method. If you
look closely at the API, you’ll see that the read() method of the base InputStream class is an abstract method. What lies behind System.in is a particular implementation of
InputStream that provides the real
implementation of the read()
method:
try{intval=System.in.read();}catch(IOExceptione){...}
Although we said that the read() method reads a byte value, the return
type in the example is int, not
byte. That’s because the read() method of basic input streams in Java
uses a convention carried over from the C language to indicate the end
of a stream with a special value. Data byte values are returned as
unsigned integers in the range 0 to 255 and the special value of
-1 is used to indicate that end of
stream has been reached. You’ll need to test for this condition when
using the simple read() method. You
can then cast the value to a byte if needed. The following example reads
each byte from an input stream and prints its value:
try{intval;while((val=System.in.read())!=-1)System.out.println((byte)val);}catch(IOExceptione){...}
As we’ve shown in the examples, the read() method can also throw an IOException if there is
an error reading from the underlying stream source. Various subclasses
of IOException may indicate that a
source such as a file or network connection has had an error.
Additionally, higher-level streams that read data types more complex
than a single byte may throw EOFException (“end of file”), which indicates
an unexpected or premature end of stream.
An overloaded form of read()
fills a byte array with as much data as possible up to the capacity of
the array and returns the number of bytes read:
byte[]buff=newbyte[1024];intgot=System.in.read(buff);
In theory, we can also check the number of bytes available for
reading at a given time on an InputStream using the available() method. With that information, we
could create an array of exactly the right size:
intwaiting=System.in.available();if(waiting>0){byte[]data=newbyte[waiting];System.in.read(data);...}
However, the reliability of this technique depends on the ability of the underlying stream implementation to detect how much data can be retrieved. It generally works for files but should not be relied upon for all types of streams.
These read() methods block
until at least some data is read (at least one byte). You must, in
general, check the returned value to determine how much data you got and
if you need to read more. (We look at nonblocking I/O later in this
chapter.) The skip() method of
InputStream provides a way of jumping
over a number of bytes. Depending on the implementation of the stream,
skipping bytes may be more efficient than reading them.
The close() method shuts
down the stream and frees up any associated system resources. It’s
important for performance to remember to close most types of streams
when you are finished using them. In some cases, streams may be closed
automatically when objects are garbage-collected, but it is not a good
idea to rely on this behavior. In Java 7, the try-with-resources language feature
was added to make automatically closing streams and other closeable
entities easier. We’ll see some examples of that later in this chapter.
The flag interface java.io.Closeable
identifies all types of stream, channel, and related utility classes
that can be closed.
Finally, we should mention that in addition to the System.in and System.out standard streams, Java provides the
java.io.Console API through System.console(). You can use the Console to read passwords without echoing them
to the screen.
Character Streams
In early versions of Java, some InputStream and OutputStream types included methods for
reading and writing strings, but most of them operated by naively
assuming that a 16-bit Unicode character was equivalent to an 8-bit byte
in the stream. This works only for Latin-1 (ISO 8859-1) characters and
not for the world of other encodings that are used with different
languages. In Chapter 10, we saw that the
java.lang.String class has a byte
array constructor and a corresponding getBytes() method that each accept character
encoding as an argument. In theory, we could use these as tools to
transform arrays of bytes to and from Unicode characters so that we
could work with byte streams that represent character data in any
encoding format. Fortunately, however, we don’t have to rely on this
because Java has streams that handle this for us.
The java.io Reader and Writer character stream classes were
introduced as streams that handle character data only. When you use
these classes, you think only in terms of characters and string data and
allow the underlying implementation to handle the conversion of bytes to
a specific character encoding. As we’ll see, some direct implementations
of Reader and Writer exist, for
example, for reading and writing files. But more generally, two special
classes, InputStreamReader and
OutputStreamWriter,
bridge the gap between the world of character streams and the world of
byte streams. These are, respectively, a Reader and a Writer that can be wrapped around any
underlying byte stream to make it a character stream. An encoding scheme
is used to convert between possible multibyte encoded values and Java
Unicode characters. An encoding scheme can be specified by name in the
constructor of InputStreamReader or
OutputStreamWriter. For convenience,
the default constructor uses the system’s default encoding
scheme.
For example, let’s parse a human-readable string from the standard
input into an integer. We’ll assume that the bytes coming from
System.in use the
system’s default encoding scheme:
try{InputStreamin=System.in;InputStreamReadercharsIn=newInputStreamReader(in);BufferedReaderbufferedCharsIn=newBufferedReader(inReader);Stringline=bufferedCharsIn.readLine();inti=NumberFormat.getInstance().parse(line).intValue();}catch(IOExceptione){}catch(ParseExceptionpe){}
First, we wrap an InputStreamReader around System.in. This reader converts the incoming
bytes of System.in to characters
using the default encoding scheme. Then, we wrap a BufferedReader around
the InputStreamReader. BufferedReader adds the readLine() method,
which we can use to grab a full line of text (up to a platform-specific,
line-terminator character combination) into a String. The string is then parsed into an
integer using the techniques described in Chapter 10.
The important thing to note is that we have taken a byte-oriented
input stream, System.in, and safely
converted it to a Reader for reading
characters. If we wished to use an encoding other than the system
default, we could have specified it in the InputStreamReader’s constructor like
so:
InputStreamReaderreader=newInputStreamReader(System.in,"UTF-8");
For each character that is read from the reader, the InputStreamReader reads one or more bytes and
performs the necessary conversion to Unicode.
In Chapter 13, we use an InputStreamReader and a Writer in our simple web server example, where
we must use a character encoding specified by the HTTP protocol. We also
return to the topic of character encodings when we discuss the java.nio.charset API, which allows you to
query for and use encoders and decoders explicitly on buffers of
characters and bytes. Both InputStreamReader and OutputStreamWriter can accept a Charset codec object as well as a character
encoding name.
Stream Wrappers
What if we want to do more than read and write a sequence
of bytes or characters? We can use a “filter” stream, which is a type of
InputStream, OutputStream, Reader, or Writer that wraps another stream and adds new
features. A filter stream takes the target stream as an argument in its
constructor and delegates calls to it after doing some additional
processing of its own. For example, we can construct a BufferedInputStream to
wrap the system standard input:
InputStreambufferedIn=newBufferedInputStream(System.in);
The BufferedInputStream is a
type of filter stream that reads ahead and buffers a certain amount of
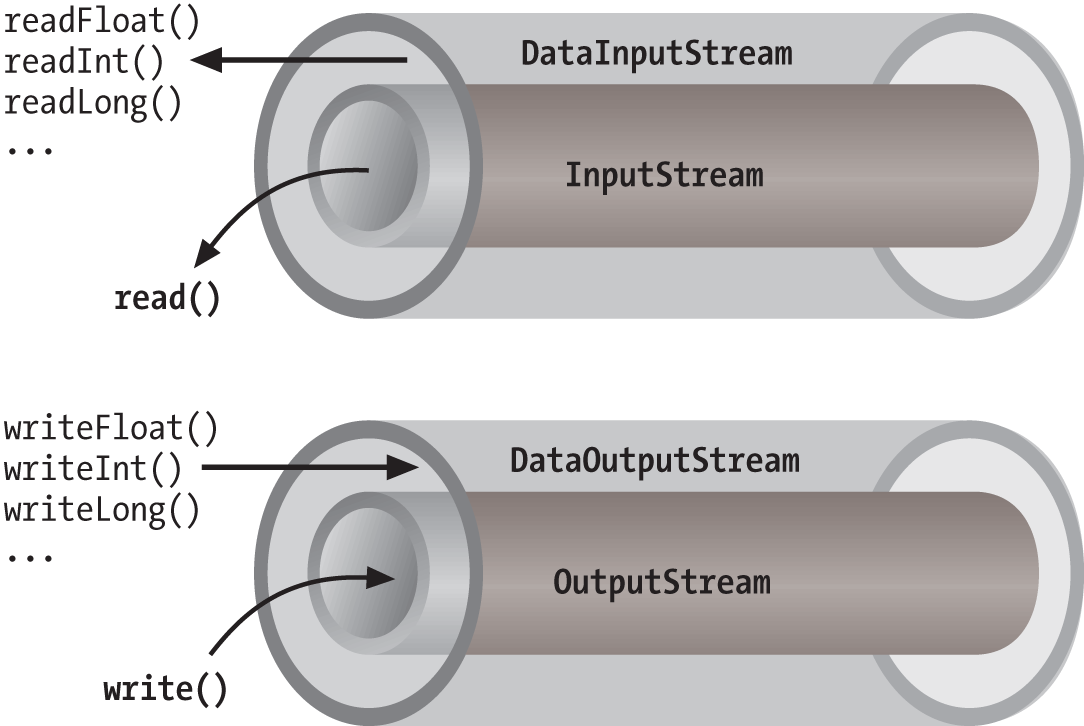
data. (We’ll talk more about it later in this chapter.) The BufferedInputStream wraps an additional layer
of functionality around the underlying stream. Figure 12-3 shows this arrangement for a
DataInputStream, which
is a type of stream that can read higher-level data types, such as Java
primitives and strings.
As you can see from the previous code snippet, the BufferedInputStream filter is a type of
InputStream. Because filter streams
are themselves subclasses of the basic stream types, they can be used as
arguments to the construction of other filter streams. This allows
filter streams to be layered on top of one another to provide different
combinations of features. For example, we could first wrap our System.in with a BufferedInputStream and then wrap the BufferedInputStream with a DataInputStream for reading special data types
with buffering.
Java provides base classes for creating new types of filter
streams: FilterInputStream,
FilterOutputStream,
FilterReader, and
FilterWriter. These
superclasses provide the basic machinery for a “no op” filter (a filter
that doesn’t do anything) by delegating all their method calls to their
underlying stream. Real filter streams subclass these and override
various methods to add their additional processing. We’ll make an
example filter stream later in this chapter.
Data streams
DataInputStream and
DataOutputStream are
filter streams that let you read or write strings and primitive data
types composed of more than a single byte. DataInputStream and DataOutputStream implement the DataInput and
DataOutput
interfaces, respectively. These interfaces define methods for reading
or writing strings and all of the Java primitive types, including
numbers and Boolean values. DataOutputStream encodes these values in a
machine-independent manner and then writes them to its underlying byte
stream. DataInputStream does the
converse.
You can construct a DataInputStream from an InputStream and then use a method such as
readDouble() to read
a primitive data type:
DataInputStreamdis=newDataInputStream(System.in);doubled=dis.readDouble();
This example wraps the standard input stream in a DataInputStream and uses it to read a
double value. The readDouble() method reads bytes from the
stream and constructs a double from
them. The DataInputStream methods
expect the bytes of numeric data types to be in network byte
order, a standard that specifies that the high-order bytes
are sent first (also known as “big endian,” as we discuss
later).
The DataOutputStream class
provides write methods that correspond to the read methods in DataInputStream. For example, writeInt() writes an
integer in binary format to the underlying output stream.
The readUTF() and
writeUTF() methods of
DataInputStream and DataOutputStream read and write a Java
String of Unicode characters using
the UTF-8 “transformation format” character encoding. UTF-8 is an
ASCII-compatible encoding of Unicode characters that is very widely
used. Not all encodings are guaranteed to preserve all Unicode
characters, but UTF-8 does. You can also use UTF-8 with Reader and Writer streams by specifying it as the
encoding name.
Buffered streams
The BufferedInputStream,
BufferedOutputStream,
BufferedReader, and
BufferedWriter
classes add a data buffer of a specified size to the stream path. A
buffer can increase efficiency by reducing the number of physical read
or write operations that correspond to read() or write() method calls.
You create a buffered stream with an appropriate input or output
stream and a buffer size. (You can also wrap another stream around a
buffered stream so that it benefits from the buffering.) Here’s a
simple buffered input stream called bis:
BufferedInputStreambis=newBufferedInputStream(myInputStream,32768);...bis.read();
In this example, we specify a buffer size of 32 KB. If we leave
off the size of the buffer in the constructor, a reasonably sized one
is chosen for us. (Currently the default is 8 KB.) On our first call
to read(), bis tries to fill our entire 32 KB buffer
with data, if it’s available. Thereafter, calls to read() retrieve data from the buffer, which
is refilled as necessary.
A BufferedOutputStream works
in a similar way. Calls to write()
store the data in a buffer; data is actually written only when the
buffer fills up. You can also use the flush() method to
wring out the contents of a BufferedOutputStream at any time. The
flush() method is actually a method
of the OutputStream class itself.
It’s important because it allows you to be sure that all data in any
underlying streams and filter streams has been sent (before, for
example, you wait for a response).
Some input streams such as BufferedInputStream support the ability to
mark a location in the data and later reset the stream to that
position. The mark() method sets
the return point in the stream. It takes an integer value that
specifies the number of bytes that can be read before the stream gives
up and forgets about the mark. The reset() method
returns the stream to the marked point; any data read after the call
to mark() is read again.
This functionality could be useful when you are reading the stream in a parser. You may occasionally fail to parse a structure and so must try something else. In this situation, you can have your parser generate an error and then reset the stream to the point before it began parsing the structure:
BufferedInputStreaminput;...try{input.mark(MAX_DATA_STRUCTURE_SIZE);return(parseDataStructure(input));}catch(ParseExceptione){input.reset();...}
The BufferedReader and
BufferedWriter classes work just
like their byte-based counterparts, except that they operate on
characters instead of bytes.
PrintWriter and PrintStream
Another useful wrapper stream is java.io.PrintWriter. This class provides a
suite of overloaded print() methods
that turn their arguments into strings and push them out the stream. A
complementary set of println()
convenience methods appends a new line to the end of the strings. For
formatted text output, printf() and the
identical format() methods allow
you to write printf-style formatted
text to the stream.
PrintWriter is an unusual
character stream because it can wrap either an OutputStream or another Writer. PrintWriter is the more capable big brother
of the legacy PrintStream byte
stream. The System.out and System.err streams are PrintStream objects; you have already seen
such streams strewn throughout this book:
System.out.("Hello, world...\n");System.out.println("Hello, world...");System.out.printf("The answer is %d",17);System.out.println(3.14);
Early versions of Java did not have the Reader and Writer classes and used PrintStream, which convert bytes to
characters by simply made assumptions about the character encoding.
You should use a PrintWriter for
all new development.
When you create a PrintWriter
object, you can pass an additional Boolean value to the constructor,
specifying whether it should “auto-flush.” If this value is true, the PrintWriter automatically performs a
flush() on the underlying OutputStream or Writer each time it sends a newline:
PrintWriterpw=newPrintWriter(myOutputStream,true/*autoFlush*/);pw.println("Hello!");// Stream is automatically flushed by the newline.
When this technique is used with a buffered output stream, it corresponds to the behavior of terminals that send data line by line.
The other big advantage that print streams have over regular
character streams is that they shield you from exceptions thrown by
the underlying streams. Unlike methods in other stream classes, the
methods of PrintWriter and PrintStream do not throw IOExceptions. Instead, they provide a method
to explicitly check for errors if required. This makes life a lot
easier for printing text, which is a very common operation. You can
check for errors with the checkError()
method:
System.out.println(reallyLongString);if(System.out.checkError()){...// uh oh
Pipes
Normally, our applications are directly involved with one
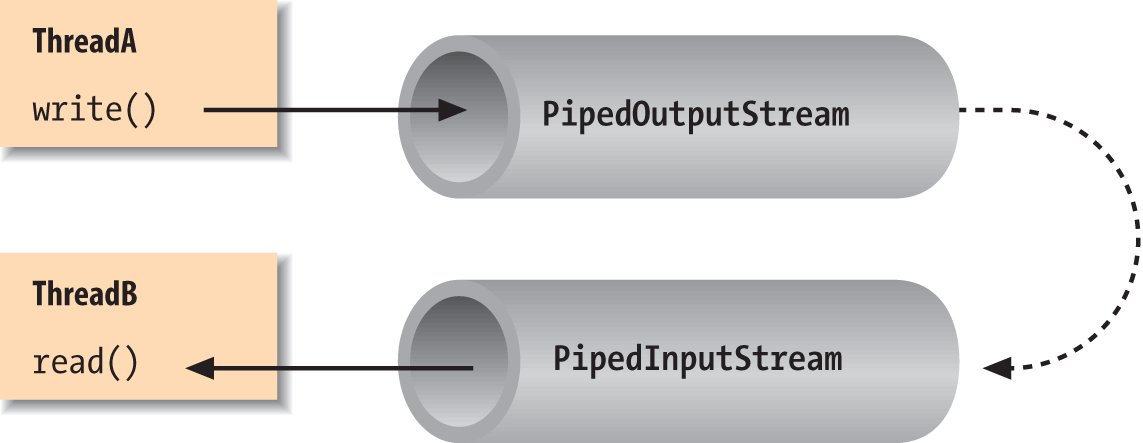
side of a given stream at a time. PipedInputStream and
PipedOutputStream (or
PipedReader and PipedWriter), however, let us create two sides
of a stream and connect them, as shown in Figure 12-4. This can be used to provide a
stream of communication between threads, for example, or as a "loopback"
for testing. Often it’s used as a crutch to interface a stream-oriented
API to a non-stream-oriented API.
To create a bytestream pipe, we use both a PipedInputStream and a PipedOutputStream. We can simply choose a side
and then construct the other side using the first as an argument:
PipedInputStreampin=newPipedInputStream();PipedOutputStreampout=newPipedOutputStream(pin);
Alternatively:
PipedOutputStreampout=newPipedOutputStream();PipedInputStreampin=newPipedInputStream(pout);
In each of these examples, the effect is to produce an input
stream, pin, and an output stream,
pout, that are connected. Data
written to pout can then be read by
pin. It is also possible to create
the PipedInputStream and the PipedOutputStream separately and then connect
them with the connect()
method.
We can do exactly the same thing in the character-based world,
using PipedReader and
PipedWriter in place of
PipedInputStream and PipedOutputStream.
After the two ends of the pipe are connected, use the two streams
as you would other input and output streams. You can use read() to read data from the PipedInputStream (or PipedReader) and write() to write data to the PipedOutputStream (or PipedWriter). If the internal buffer of the
pipe fills up, the writer blocks and waits until space is available.
Conversely, if the pipe is empty, the reader blocks and waits until some
data is available.
One advantage to using piped streams is that they provide stream
functionality in our code without compelling us to build new,
specialized streams. For example, we can use pipes to create a simple
logging or “console” facility for our application. We can send messages
to the logging facility through an ordinary PrintWriter, and then it can do whatever
processing or buffering is required before sending the messages off to
their ultimate destination. Because we are dealing with string messages,
we use the character-based PipedReader and PipedWriter classes. The following example
shows the skeleton of our logging facility:
classLoggerDaemonextendsThread{PipedReaderin=newPipedReader();LoggerDaemon(){start();}publicvoidrun(){BufferedReaderbin=newBufferedReader(in);Strings;try{while((s=bin.readLine())!=null){// process line of data}}catch(IOExceptione){}}PrintWritergetWriter()throwsIOException{returnnewPrintWriter(newPipedWriter(in));}}classmyApplication{publicstaticvoidmain(String[]args)throwsIOException{PrintWriterout=newLoggerDaemon().getWriter();out.println("Application starting...");// ...out.println("Warning: does not compute!");// ...}}
LoggerDaemon reads
strings from its end of the pipe, the PipedReader named in. LoggerDaemon also provides a method,
getWriter(), which
returns a PipedWriter that is
connected to its input stream. To begin sending messages, we create a
new LoggerDaemon and fetch the output
stream. In order to read strings with the readLine() method,
LoggerDaemon wraps a BufferedReader around its PipedReader. For convenience, it also presents
its output pipe as a PrintWriter
rather than a simple Writer.
One advantage of implementing LoggerDaemon with pipes is that we can log
messages as easily as we write text to a terminal or any other stream.
In other words, we can use all our normal tools and techniques,
including printf(). Another advantage
is that the processing happens in another thread, so we can go about our
business while any processing takes place.
Streams from Strings and Back
StringReader is
another useful stream class; it essentially wraps stream functionality
around a String. Here’s how to use a
StringReader:
Stringdata="There once was a man from Nantucket...";StringReadersr=newStringReader(data);charT=(char)sr.read();charh=(char)sr.read();chare=(char)sr.read();
Note that you will still have to catch IOExceptions that are
thrown by some of the StringReader’s
methods.
The StringReader class is
useful when you want to read data from a String as if it were coming from a stream,
such as a file, pipe, or socket. Suppose you create a parser that
expects to read from a stream, but you want to provide an alternative
method that also parses a big string. You can easily add one using
StringReader.
Turning things around, the StringWriter class lets
us write to a character buffer via an output stream. The internal buffer
grows as necessary to accommodate the data. When we are done, we can
fetch the contents of the buffer as a String. In the following example, we create a
StringWriter and wrap it in a
PrintWriter for
convenience:
StringWriterbuffer=newStringWriter();PrintWriterout=newPrintWriter(buffer);out.println("A moose once bit my sister.");out.println("No, really!");Stringresults=buffer.toString();
First, we print a few lines to the output stream to give it some
data and then retrieve the results as a string with the toString() method. Alternately, we could get
the results as a StringBuffer object
using the getBuffer()
method.
The StringWriter class is
useful if you want to capture the output of something that normally
sends output to a stream, such as a file or the console. A PrintWriter wrapped around a StringWriter is a viable alternative to using
a StringBuffer to construct large
strings piece by piece.
The ByteArrayInputStream
and ByteArrayOutputStream
work with bytes in the same way the previous examples worked with
characters. You can write byte data to a ByteArrayOutputStream and retrieve it later
with the toByteArray() method.
Conversely, you can construct a ByteArrayInputStream from a byte array as
StringReader does with a String. For example, if we want to see exactly
what our DataOutputStream is writing
when we tell it to encode a particular value, we could capture it with a
byte array output stream:
ByteArrayOutputStreambao=newByteArrayOutputStream();DataOutputStreamdao=newDataOutputStream(bao);dao.writeInt(16777216);dao.flush();byte[]bytes=bao.toByteArray();for(byteb:bytes)System.out.println(b);// 1, 0, 0, 0
Implementing a Filter Stream
Before we leave streams, let’s try making one of our own.
We mentioned earlier that specialized stream wrappers are built on top
of the FilterInputStream and
FilterOutputStream
classes. It’s quite easy to create our own subclass of FilterInputStream that can be wrapped around
other streams to add new functionality.
The following example, rot13InputStream, performs a
rot13 (rotate by 13 letters) operation on the bytes
that it reads. rot13 is a trivial obfuscation
algorithm that shifts alphabetic characters to make them not quite
human-readable (it simply passes over nonalphabetic characters without
modifying them). rot13 is cute because it’s
symmetric: to “un-rot13” some text, you simply rot13 it again. Here’s
our rot13InputStream class:
publicclassrot13InputStreamextendsFilterInputStream{publicrot13InputStream(InputStreami){super(i);}publicintread()throwsIOException{returnrot13(in.read());}// should override additional read() methodsprivateintrot13(intc){if((c>='A')&&(c<='Z'))c=(((c-'A')+13)%26)+'A';if((c>='a')&&(c<='z'))c=(((c-'a')+13)%26)+'a';returnc;}}
The FilterInputStream needs to
be initialized with an InputStream;
this is the stream to be filtered. We provide an appropriate constructor
for the rot13InputStream class and
invoke the parent constructor with a call to super(). FilterInputStream contains a protected
instance variable, in, in which it
stores a reference to the specified InputStream, making it available to the rest
of our class.
The primary feature of a FilterInputStream is that it delegates its
input tasks to the underlying InputStream. For instance, a call to FilterInputStream’s read() method simply turns around and calls
the read() method of the underlying
InputStream to fetch a byte. The
filtering happens when we do our extra work on the data as it passes
through. In our example, the read()
method fetches a byte from the underlying InputStream, in, and then performs the rot13 shift on the
byte before returning it. The rot13()
method shifts alphabetic characters while simply passing over all other
values, including the end-of-stream value (-1). Our subclass is now a rot13
filter.
read() is the only InputStream method that FilterInputStream overrides. All other normal
functionality of an InputStream, such
as skip() and available(), is
unmodified, so calls to these methods are answered by the underlying
InputStream.
Strictly speaking, rot13InputStream works only on an ASCII byte
stream because the underlying algorithm is based on the Roman alphabet.
A more generalized character-scrambling algorithm would have to be based
on FilterReader to handle 16-bit
Unicode classes correctly. (Anyone want to try rot32768?) We should also
note that we have not fully implemented our filter: we should also
override the version of read() that
takes a byte array and range specifiers, perhaps delegating it to our
own read. Unless we do so, a reader
using that method would get the raw stream.
File I/O
In this chapter, we’re going to talk about the Java file I/O API. To
be more precise, we are going to talk about two file APIs: first, there is
the core java.io File I/O facility that
has been part of Java since the beginning. Then there is the “new”
java.nio.file API introduced in Java 7.
In general the NIO packages, which we’ll cover in detail later and which
touch upon not only files but all types of network and channel I/O, were
introduced to add advanced features that make Java more scaleable and
higher performance. However, in the case of file NIO, the new package is
also just somewhat of a “do-over” on the original API. In movie terms, you
can think of the two APIs as the “classic” and the “reboot” of the series.
The new API completely duplicates the functionality of the original, but
because the core API is so fundamental (and in some cases simpler), it is
likely that many people will prefer to keep using it. We’ll start with the
classic API centering on java.io.File
and later we’ll cover the new API, which centers on the analogous java.nio.Path.
Working with files in Java is easy, but poses some conceptual problems. Real-world filesystems can vary widely in architecture and implementation: think of the differences between Mac, PC, and Unix systems when it comes to filenames. Java tries to mask some of these differences and provide information to help an application tailor itself to the local environment, but it leaves a lot of the details of file access implementation dependent. We’ll talk about techniques for dealing with this as we go.
Before we leave File I/O we’ll also show you some tools for the special case of application “resource” files packaged with your app and loaded via the Java classpath.
The java.io.File Class
The java.io.File class
encapsulates access to information about a file or directory. It can be
used to get attribute information about a file, list the entries in a
directory, and perform basic filesystem operations, such as removing a
file or making a directory. While the File object handles these “meta” operations,
it doesn’t provide the API for reading and writing file data; there are
file streams for that purpose.
File constructors
You can create an instance of File from a String pathname:
FilefooFile=newFile("/tmp/foo.txt");FilebarDir=newFile("/tmp/bar");
You can also create a file with a relative path:
Filef=newFile("foo");
In this case, Java works relative to the "current working
directory" of the Java interpreter. You can determine the current
working directory by reading the user.dir property in the System Properties list:
System.getProperty("user.dir");// e.g.,"/Users/pat"
An overloaded version of the File constructor lets you specify the
directory path and filename as separate String objects:
FilefooFile=newFile("/tmp","foo.txt");
With yet another variation, you can specify the directory with a
File object and the filename with a
String:
FiletmpDir=newFile("/tmp");// File for directory /tmpFilefooFile=newFile(tmpDir,"foo.txt");
None of these File
constructors actually creates a file or directory, and it is not an
error to create a File object for a
nonexistent file. The File object
is just a handle for a file or directory whose properties you may wish
to read, write, or test. For example, you can use the exists() instance method to learn whether
the file or directory exists.
Path localization
One issue with working with files in Java is that pathnames are expected to follow the conventions of the local filesystem. Two differences are that the Windows filesystem uses “roots” or drive letters (for example, C:) and a backslash (\) instead of the forward slash (/) path separator that is used in other systems.
Java tries to compensate for the differences. For example, on Windows platforms, Java accepts paths with either forward slashes or backslashes. (On others, however, it only accepts forward slashes.)
Your best bet is to make sure you follow the filename
conventions of the host filesystem. If your application has a GUI that
is opening and saving files at the user’s request, you should be able
to handle that functionality with the Swing JFileChooser class.
This class encapsulates a graphical file-selection dialog box. The
methods of the JFileChooser take
care of system-dependent filename features for you.
If your application needs to deal with files on its own behalf,
however, things get a little more complicated. The File class contains a few static variables to make this task possible.
File.separator defines a String that specifies the file separator on
the local host (e.g., / on Unix and
Macintosh systems and \ on Windows
systems); File.separatorChar
provides the same information as a char.
You can use this system-dependent information in several ways.
Probably the simplest way to localize pathnames is to pick a
convention that you use internally, such as the forward slash (/), and
do a String replace to substitute
for the localized separator character:
// we'll use forward slash as our standardStringpath="mail/2004/june/merle";path=path.replace('/',File.separatorChar);Filemailbox=newFile(path);
Alternatively, you could work with the components of a pathname and build the local pathname when you need it:
String[]path={"mail","2004","june","merle"};StringBuffersb=newStringBuffer(path[0]);for(inti=1;i<path.length;i++)sb.append(File.separator+path[i]);Filemailbox=newFile(sb.toString());
One thing to remember is that Java interprets a literal
backslash character (\) in source
code as an escape character when used in a String. To get a backslash in a String, you have to use \\.
To grapple with the issue of filesystems with multiple “roots”
(for example, C:\ on Windows), the
File class provides the static
method listRoots(), which
returns an array of File objects
corresponding to the filesystem root directories. Again, in a GUI
application, a graphical file chooser dialog shields you from this
problem entirely.
File operations
Once we have a File
object, we can use it to ask for information about and perform
standard operations on the file or directory it represents. A number
of methods let us ask questions about the File. For example, isFile() returns
true if the File represents a regular file, while
isDirectory() returns
true if it’s a directory.
isAbsolute()
indicates whether the File
encapsulates an absolute path or
relative path specification. An absolute path is
a system-dependent notion that means that the path doesn’t depend on
the application’s working directory or any concept of a working root
or drive (e.g., in Windows, it is a full path including the drive
letter: c:\\Users\pat\foo.txt).
Components of the File
pathname are available through the following methods: getName(), getPath(), getAbsolutePath(),
and getParent(). getName() returns a String for the filename without any
directory information. If the File
has an absolute path specification, getAbsolutePath() returns that path.
Otherwise, it returns the relative path appended to the current
working directory (attempting to make it an absolute path). getParent() returns the parent directory of
the file or directory.
The string returned by getPath() or getAbsolutePath() may not follow the same
case conventions as the underlying filesystem. You can retrieve the
filesystem’s own or “canonical” version of the file’s path by using
the method getCanonicalPath(). In
Windows, for example, you can create a File object whose getAbsolutePath() is
C:\Autoexec.bat but whose getCanonicalPath() is
C:\AUTOEXEC.BAT; both actually point to the same
file. This is useful for comparing filenames that may have been
supplied with different case conventions or for showing them to the
user.
You can get or set the modification time of a file or directory
with lastModified() and
setLastModified()
methods. The value is a long that
is the number of milliseconds since the epoch
(Jan 1, 1970, 00:00:00 GMT). We can also get the size of the file in
bytes with length().
Here’s a fragment of code that prints some information about a file:
FilefooFile=newFile("/tmp/boofa");Stringtype=fooFile.isFile()?"File ":"Directory ";Stringname=fooFile.getName();longlen=fooFile.length();System.out.println(type+name+", "+len+" bytes ");
If the File object
corresponds to a directory, we can list the files in the directory
with the list() method or the
listFiles()
method:
FiletmpDir=newFile("/tmp");String[]fileNames=tmpDir.list();File[]files=tmpDir.listFiles();
list() returns an array of
String objects that contains
filenames. listFiles() returns an
array of File objects. Note that in
neither case are the files guaranteed to be in any kind of order
(alphabetical, for example). You can use the Collections API to sort
strings alphabetically like so:
Listlist=Arrays.asList(sa);Collections.sort(list);
If the File refers to a
nonexistent directory, we can create the directory with mkdir() or mkdirs(). The
mkdir() method creates at most a
single directory level, so any intervening directories in the path
must already exist. mkdirs()
creates all directory levels necessary to create the full path of the
File specification. In either case,
if the directory cannot be created, the method returns false. Use renameTo() to rename
a file or directory and delete() to delete a
file or directory.
Although we can create a directory using the File object, this isn’t the most common way
to create a file; that’s normally done implicitly when we intend to
write data to it with a FileOutputStream or FileWriter, as we’ll discuss in a moment.
The exception is the createNewFile()
method, which can be used to attempt to create a new zero-length file
at the location pointed to by the File object. The useful thing about this
method is that the operation is guaranteed to be “atomic” with respect
to all other file creation in the filesystem. createNewFile() returns a Boolean value that
tells you whether the file was created or not. This is sometimes used
as a primitive locking feature—whoever creates the file first
“wins.” (The NIO package supports true file locks, as we’ll see
later.) This is useful in combination deleteOnExit(), which
flags the file to be automatically removed when the Java VM exits.
This combination allows you to guard resources or make an application
that can only be run in a single instance at a time. Another file
creation method that is related to the File class itself is the static method
createTempFile(), which creates a
file in a specified location using an automatically generated unique
name. This, too, is useful in combination with deleteOnExit().
The toURL() method
converts a file path to a file: URL
object. URLs are an abstraction that allows you to point to any kind
of object anywhere on the Net. Converting a File reference to a URL may be useful for
consistency with more general utilities that deal with URLs. See Chapter 14 for details. File URLs also come into
greater use with the NIO File API where they can be used to reference
new types of filesystems that are implemented directly in Java
code.
Table 12-1 summarizes the
methods provided by the File
class.
Method |
Return type |
Description |
|
Is the file executable? |
|
|
Is the file (or directory) readable? |
|
|
Is the file (or directory) writable? |
|
|
Creates a new file. |
|
|
Static method to create a new file, with the specified prefix and suffix, in the default temp file directory. |
|
|
Deletes the file (or directory). |
|
|
|
When it exits, Java runtime system deletes the file. |
|
Does the file (or directory) exist? |
|
|
Returns the absolute path of the file (or directory). |
|
|
Returns the absolute, case-correct path of the file (or directory). |
|
|
Get the number of bytes of unallocated space on the partition holding this path or 0 if the path is invalid. |
|
|
Returns the name of the file (or directory). |
|
|
Returns the name of the parent directory of the file (or directory). |
|
|
Returns the path of the file (or
directory). (Not to be confused with |
|
|
Get the size of the partition that contains the file path in bytes or 0 if the path is invalid. |
|
|
Get the number of bytes of user-accessible unallocated space on the partition holding this path or 0 if the path is invalid. This method attempts to take into account user write permissions. |
|
|
Is the filename (or directory name) absolute? |
|
|
Is the item a directory? |
|
|
Is the item a file? |
|
|
Is the item hidden? (System-dependent.) |
|
|
Returns the last modification time of the file (or directory). |
|
|
Returns the length of the file. |
|
|
Returns a list of files in the directory. |
|
|
Returns the contents of the
directory as an array of |
|
|
Returns array of root filesystems if any (e.g., C:/, D:/). |
|
|
Creates the directory. |
|
|
Creates all directories in the path. |
|
|
Renames the file (or directory). |
|
|
Sets execute permissions for the file. |
|
|
Sets the last-modified time of the file (or directory). |
|
|
Sets read permissions for the file. |
|
|
Sets the file to read-only status. |
|
|
Sets the write permissions for the file. |
|
|
Convert the File to an NIO File Path
(see the NIO File API). (Not to be confused with |
|
|
File Streams
OK, you’re probably sick of hearing about files already
and we haven’t even written a byte yet! Well, now the fun begins. Java
provides two fundamental streams for reading from and writing to files:
FileInputStream and
FileOutputStream. These
streams provide the basic byte-oriented InputStream and OutputStream functionality that is applied to
reading and writing files. They can be combined with the filter streams
described earlier to work with files in the same way as other stream
communications.
You can create a FileInputStream from a String pathname or a File object:
FileInputStreamin=newFileInputStream("/etc/passwd");
When you create a FileInputStream, the Java runtime system
attempts to open the specified file. Thus, the FileInputStream constructors can throw a
FileNotFoundException
if the specified file doesn’t exist or an IOException if some
other I/O error occurs. You must catch these exceptions in your code.
Wherever possible, it’s a good idea to get in the habit of using the new
Java 7 try-with-resources construct
to automatically close files for you when you are finished with
them:
try(FileInputStreamfin=newFileInputStream("/etc/passwd")){....// Fin will be closed automatically if needed upon exiting the try clause.}
When the stream is first created, its available() method and the File object’s length() method should return the same
value.
To read characters from a file as a Reader, you can wrap an InputStreamReader around a FileInputStream. If you want to use the
default character-encoding scheme for the platform, you can use the
FileReader class instead, which is
provided as a convenience. FileReader
is just a FileInputStream wrapped in
an InputStreamReader with some
defaults. For some crazy reason, you can’t specify a character encoding
for the FileReader to use, so it’s
probably best to ignore it and use InputStreamReader with FileInputStream.
The following class, ListIt ,
is a small utility that sends the contents of a file or directory to
standard output:
//file: ListIt.javaimportjava.io.*;classListIt{publicstaticvoidmain(Stringargs[])throwsException{Filefile=newFile(args[0]);if(!file.exists()||!file.canRead()){System.out.println("Can't read "+file);return;}if(file.isDirectory()){String[]files=file.list();for(Stringfile:files)System.out.println(file);}elsetry{Readerir=newInputStreamReader(newFileInputStream(file));BufferedReaderin=newBufferedReader(ir);Stringline;while((line=in.readLine())!=null)System.out.println(line);}catch(FileNotFoundExceptione){System.out.println("File Disappeared");}}}
ListIt constructs a File object from its first command-line
argument and tests the File to see
whether it exists and is readable. If the File is a directory, ListIt outputs the names of the files in the
directory. Otherwise, ListIt reads
and outputs the file, line by line.
For writing files, you can create a FileOutputStream from a String pathname or a File object. Unlike FileInputStream, however, the FileOutputStream constructors don’t throw a
FileNotFoundException. If the
specified file doesn’t exist, the FileOutputStream creates the file. The
FileOutputStream constructors can
throw an IOException if some other
I/O error occurs, so you still need to handle this exception.
If the specified file does exist, the FileOutputStream opens it for writing. When
you subsequently call the write()
method, the new data overwrites the current contents of the file. If you
need to append data to an existing file, you can use a form of the
constructor that accepts a Boolean append flag:
FileInputStreamfooOut=newFileOutputStream(fooFile);// overwrite fooFileFileInputStreampwdOut=newFileOutputStream("/etc/passwd",true);// append
Another way to append data to files is with RandomAccessFile, which we’ll discuss
shortly.
Just as with reading, to write characters (instead of bytes) to a
file, you can wrap an OutputStreamWriter
around a FileOutputStream. If you
want to use the default character-encoding scheme, you can use the
FileWriter class instead, which is
provided as a convenience.
The following example reads a line of data from standard input and writes it to the file /tmp/foo.txt:
Strings=newBufferedReader(newInputStreamReader(System.in)).readLine();Fileout=newFile("/tmp/foo.txt");FileWriterfw=newFileWriter(out);PrintWriterpw=newPrintWriter(fw)pw.println(s);pw.close();
Notice how we wrapped the FileWriter in a PrintWriter to facilitate writing the data.
Also, to be a good filesystem citizen, we called the close() method when we’re done with the
FileWriter. Here, closing the
PrintWriter closes the underlying
Writer for us. We also could have
used try-with-resources
here.
RandomAccessFile
The java.io.RandomAccessFile class provides the
ability to read and write data at a specified location in a file.
RandomAccessFile implements both the
DataInput and DataOutput interfaces, so you can use it to
read and write strings and primitive types at locations in the file just
as if it were a DataInputStream and
DataOutputStream. However, because
the class provides random, rather than sequential, access to file data,
it’s not a subclass of either InputStream or OutputStream.
You can create a RandomAccessFile from a String pathname or a File object. The constructor also takes a
second String argument that specifies
the mode of the file. Use the string r for a read-only file or rw for a read/write file.
try{RandomAccessFileusers=newRandomAccessFile("Users","rw")}catch(IOExceptione){...}
When you create a RandomAccessFile in read-only mode, Java tries
to open the specified file. If the file doesn’t exist, RandomAccessFile throws an IOException. If,
however, you’re creating a RandomAccessFile in read/write mode, the
object creates the file if it doesn’t exist. The constructor can still
throw an IOException if another I/O
error occurs, so you still need to handle this exception.
After you have created a RandomAccessFile, call any of the normal
reading and writing methods, just as you would with a DataInputStream or DataOutputStream. If you try to write to a
read-only file, the write method throws an IOException.
What makes a RandomAccessFile
special is the seek() method. This
method takes a long value and uses it
to set the byte offset location for reading and writing in the file. You
can use the getFilePointer() method
to get the current location. If you need to append data to the end of
the file, use length() to determine
that location, then seek() to it. You
can write or seek beyond the end of a file, but you can’t read beyond
the end of a file. The read() method
throws an EOFException if you try
to do this.
Here’s an example of writing data for a simplistic database:
users.seek(userNum*RECORDSIZE);users.writeUTF(userName);users.writeInt(userID);...
In this naive example, we assume that the String length for userName, along with any data that comes after
it, fits within the specified record size.
Resource Paths
A big part of packaging and deploying an application is
dealing with all of the resource files that must go with it, such as
configuration files, graphics, and application data. Java provides
several ways to access these resources. One way is to simply open files
and read the bytes. Another is to construct a URL pointing to a
well-known location in the filesystem or over the network. (We’ll
discuss working with URLs in detail in Chapter 14.) The problem with these methods is that
they generally rely on knowledge of the application’s location and
packaging, which could change or break if it is moved. What is really
needed is a universal way to access resources associated with our
application, regardless of how it’s installed. The Class class’s getResource() method
and the Java classpath provides just this. For example:
URLresource=MyApplication.class.getResource("/config/config.xml");
Instead of constructing a File
reference to an absolute file path, or relying on composing information
about an install directory, the getResource() method provides a standard way
to get resources relative to the classpath of the application. A
resource can be located either relative to a given class file or to the
overall system classpath. getResource() uses the classloader that loads
the application’s class files to load the data. This means that no
matter where the application classes reside—a web server, the local
filesystem, or even inside a JAR file or other archive—we can load
resources packaged with those classes consistently.
Although we haven’t discussed URLs yet, we can tell you that many
APIs for loading data (for example, images) accept a URL directly. If
you’re reading the data yourself, you can ask the URL for an InputStream with the URL openStream() method and treat it like any
other stream. A convenience method called getResourceAsStream()
skips this step for you and returns an InputStream directly.
getResource() takes as an
argument a slash-separated resource path for the
resource and returns a URL. There are two kinds of resource paths:
absolute and relative. An absolute path begins with a slash (for
example, /config/config.xml). In this case, the
search for the object begins at the “top” of the classpath. By the “top”
of the classpath, we mean that Java looks within each element of the
classpath (directory or JAR file) for the specified file. Given
/config/config.xml, it would check each directory
or JAR file in the path for the file
config/config.xml. In this case, the class on which
getResource() is called doesn’t
matter as long as it’s from a class loader that has the resource file in
its classpath. For example:
URLdata=AnyClass.getResource("/config/config.xml");
On the other hand, a relative URL does not begin with a slash (for
example, mydata.txt). In this case, the search
begins at the location of the class file on which getResource() is called. In other words, the
path is relative to the package of the target class file. For example,
if the class file foo.bar.MyClass is located at the
path foo/bar/MyClass.class in some directory or JAR
of the classpath and the file mydata.txt is in the
same directory (foo/bar/mydata.txt), we can request
the file via MyClass with:
URLdata=MyClass.getResource("mydata.txt");
In this case, the class and file come from the same logical directory. We say logical because the search is not limited to the classpath element from which the class was loaded. Instead, the same relative path is searched in each element of the classpath—just as with an absolute path—until it is found. Although we’d expect the file mydata.txt to be packaged physically with MyClass.class, it might be found in another JAR file or directory at the same relative and corresponding location.
For example, here’s an application that looks up some resources:
packagemypackage;importjava.net.URL;importjava.io.IOException;publicclassFindResources{publicstaticvoidmain(String[]args)throwsIOException{// absolute from the classpathURLurl=FindResources.class.getResource("/mypackage/foo.txt");// relative to the class locationurl=FindResources.class.getResource("foo.txt");// another relative documenturl=FindResources.class.getResource("docs/bar.txt");}}
The FindResources class belongs
to the mypackage package, so its
class file will live in a mypackage directory
somewhere on the classpath. FindResources locates the document
foo.txt using an absolute and then a relative URL.
At the end, FindResources uses a
relative path to reach a document in the
mypackage/docs directory. In each case, we refer to
the FindResources’s Class object using the static .class notation. Alternatively, if we had an
instance of the object, we could use its getClass() method to
reach the Class object.
Again, getResource() returns a
URL for whatever type of object you reference. This could be a text file
or properties file that you want to read as a stream, or it might be an
image or sound file or some other object. You can open a stream to the
URL to parse the data yourself or hand the URL over to an API that deals
with URLs. We discuss URLs in depth in Chapter 14. We should also emphasize that loading
resources in this way completely shields your application from the
details of how it is packaged or deployed. You may start with your
application in loose files and then package it into a JAR file and the
resources will still be loaded. Java applets (discussed in a later
chapter) may even load files in this way over the network because the
applet class loader treats the server as part of its
classpath.
The NIO File API
We are now going to turn our attention from the original, “classic” Java File API to the new, NIO, File API introduced with Java 7. As we mentioned earlier, the NIO File API can be thought of as either a replacement for or a complement to the classic API. Included in the NIO package, the new API is nominally part of an effort to move Java toward a higher performance and more flexible style of I/O supporting selectable and asynchronously interruptable channels. However, in the context of working with files, the new API’s strength is that it provides a fuller abstraction of the filesystem in Java.
In addition to better support for existing, real world, filesystem types—including for the first time the ability to copy and move files, manage links, and get detailed file attributes like owners and permissions—the new File API allows entirely new types of filesystems to be implemented directly in Java. The best example of this is the new ZIP filesystem provider that makes it possible to “mount” a ZIP archive file as a filesystem and work with the files within it directly using the standard APIs, just like any other filesystem. Additionally, the NIO File package provides some utilities that would have saved Java developers a lot of repeated code over the years, including directory tree change monitoring, filesystem traversal (a visitor pattern), filename “globbing,” and convenience methods to read entire files directly into memory.
We’ll cover the basic File API in this section and return to the NIO
API again at the end of the chapter when we cover the full details of NIO
buffers and channels. In particular, we’ll talk about ByteChannels and FileChannel, which you can think of as
alternate, buffer-oriented streams for reading and writing files and other
types of data.
FileSystem and Path
The main players in the java.nio.file package
are: the FileSystem, which represents
an underlying storage mechanism and serves as a factory for Path objects; the Path, which represents a file or directory
within the filesystem; and the Files
utility, which contains a rich set of static methods for manipulating
Path objects to perform all of the
basic file operations analogous to the classic API.
The FileSystems (plural)
class is our starting point. It is a factory for a FileSystem object:
// The default host computer filesystemFileSystemfs=FileSystems.getDefault();// A custom filesystemURIzipURI=URI.create("jar:file:/Users/pat/tmp/MyArchive.zip");FileSystemzipfs=FileSystems.newFileSystem(zipURI,env));
As shown in this snippet, often we’ll simply ask for the default
filesystem to manipulate files in the host computer’s environment, as
with the classic API. But the FileSystems class can also construct a
FileSystem by taking a URI (a special
identifier) that references a custom filesystem type. We’ll show an
example of working with the ZIP filesystem provider later in this
chapter when we discuss data compression.
FileSystem implements Closeable and when a FileSystem is closed, all open file channels
and other streaming objects associated with it are closed as well.
Attempting to read or write to those channels will throw an exception at
that point. Note that the default filesystem (associated with the host
computer) cannot be closed.
Once we have a FileSystem, we
can use it as a factory for Path
objects that represent files or directories. A Path can be constructed using a string
representation just like the classic File, and subsequently used with methods of
the Files utility to create, read,
write, or delete the item.
PathfooPath=fs.getPath("/tmp/foo.txt");OutputStreamout=Files.newOutputStream(fooPath);
This example opens an OutputStream to write to the file foo.txt. By default, if the file does not
exist, it will be created and if it does exist, it will be truncated
(set to zero length) before new data is written—but you can change these
results using options. We’ll talk more about Files methods in the next section.
The Path object implements the
java.lang.Iterable interface, which
can be used to iterate through its literal path components (e.g., the
slash separated “tmp” and “foo.txt” in the preceding snippet). Although
if you want to traverse the path to find other files or directories, you
might be more interested in the DirectoryStream and FileVisitor that we’ll discuss later. Path also implements the java.nio.file.Watchable
interface, which allows it to be monitored for changes. We’ll also
discuss watching file trees for changes in an upcoming section.
Path has convenience methods for resolving paths relative to a file or directory.
PathpatPath=fs.getPath("/User/pat/");PathpatTmp=patPath.resolve("tmp");// "/User/pat/tmp"// Same as above, using a PathPathtmpPath=fs.getPath("tmp");PathpatTmp=patPath.resolve(tmpPath);// "/User/pat/tmp"// Resolving a given absolute path against any path just yields given pathPathabsPath=patPath.resolve("/tmp");// "/tmp"// Resolve sibling to Pat (same parent)PathdanPath=patPath.resolveSibling("dan");// "/Users/dan"
In this snippet, we’ve shown the Pathresolve() and
resolveSibling()
methods used to find files or directories relative to a given Path object. The resolve() method is generally used to append a
relative path to an existing Path
representing a directory. If the argument provided to the resolve() method is an absolute path, it will
just yield the absolute path (it acts kind of like the Unix or DOS “cd”
command). The resolveSibling() method
works the same way, but it is relative to the parent of the target
Path; this method is useful for
describing the target of a move()
operation.
Path to classic file and back
To bridge the old and new APIs, corresponding toPath() and
toFile() methods have
been provided in java.io.File and
java.nio.file.Path, respectively,
to convert to the other form. Of course, the only types of Paths that can be produced from File are
paths representing files and directories in the default host
filesystem.
PathtmpPath=fs.getPath("/tmp");Filefile=tmpPath.toFile();FiletmpFile=newFile("/tmp");Pathpath=tmpFile.toPath();
NIO File Operations
Once we have a Path, we
can operate on it with static methods of the Files utility to create the path as a file or
directory, read and write to it, and interrogate and set its properties.
We’ll list the bulk of them and then discuss some of the more important
ones as we proceed.
The following table summarizes these methods of the java.nio.file.Files class. As you might
expect, because the Files class
handles all types of file operations, it contains a large number of
methods. To make the table more readable, we have elided overloaded
forms of the same method (those taking different kinds of arguments) and
grouped corresponding and related types of methods together.
| Method | Return type | Description |
copy() |
long or Path
|
Copy a stream to a file path, file path to stream, or
path to path. Returns the number of bytes copied or the target
Path. A target file may
optionally be replaced if it exists (the default is to fail if
the target exists). Copying a directory results in an empty
directory at the target (the contents are not copied). Copying a
symbolic link copies the linked files data (producing a regular
file copy). |
createDirectory(),
createDirectories()
|
Path |
Create a single directory or all directories in a
specified path. createDirectory() throws an exception
if the directory already exists, whereas createDirectories() will ignore
existing directories and only create as needed. |
createFile() |
Path |
Creates an empty file. The operation is atomic and will only succeed if the file does not exist. (This property can be used to create flag files to guard resources, etc.) |
createTempDirectory(),
createTempFile()
|
Path |
Create a temporary, guaranteed, uniquely named directory or file with the specified prefix. Optionally place it in the system default temp directory. |
delete(), deleteIfExists()
|
void | Delete a file or an empty directory. deleteIfExists() will
not throw an exception if the file does not exist. |
exists(), notExists()
|
boolean | Determine whether the file exists (notExists() simply returns the
opposite). Optionally specify whether links should be followed
(by default they are). |
exists(), isDirectory(), isExecutable(), isHidden(), isReadable(), isRegularFile(), isWriteable()
|
boolean | Tests basic file features: whether the path exists, is a directory, and other basic attributes. |
createLink(), createSymbolicLink(), isSymbolicLink(), readSymbolicLink(), createLink()
|
boolean or Path
|
Create a hard or symbolic link, test to see if a file is a symbolic link, or read the target file pointed to by the symbolic link. Symbolic links are files that reference other files. Regular (“hard”) links are low-level mirrors of a file where two filenames point to the same underlying data. If you don’t know which to use, use a symbolic link. |
getAttribute(),
setAttribute(), getFileAttributeView(), readAttributes()
|
Object, Map, or FileAttributeView
|
Get or set filesystem-specific file attributes such as access and update times, detailed permissions, and owner information using implementation-specific names. |
getFileStore() |
FileStore |
Get a FileStore object
that represents the device, volume, or other type of partition
of the filesystem on which the path resides. |
getLastModifiedTime(),
setLastModifiedTime()
|
FileTime or Path
|
Get or set the last modified time of a file or directory. |
getOwner(), setOwner()
|
UserPrincipal |
Get or set a UserPrincipal object representing the
owner of the file. Use toString() or getName() to get a string
representation of the user name. |
getPosixFilePermissions(), setPosixFilePermissions()
|
Set or Path
|
Get or set the full POSIX user-group-other style read and
write permissions for the path as a Set of PosixFilePermission enum
values. |
isSameFile() |
boolean | Test to see whether the two paths reference the same file (which may potentially be true even if the paths are not identical). |
move() |
Path |
Move a file or directory by renaming or copying it,
optionally specifying whether to replace any existing target.
Rename will be used unless a copy is required to move a file
across file stores or filesystems. Directories can be moved
using this method only if the simple rename is possible or if
the directory is empty. If a directory move requires copying
files across file stores or filesystems, the method throws an
IOException. (In this case,
you must copy the files yourself. See walkFileTree().) |
newBufferedReader(),
newBufferedWriter()
|
BufferedReader or
BufferedWriter
|
Open a file for reading via a BufferedReader, or create and open a
file for writing via a BufferedWriter. In both cases, a
character encoding is specified. |
newByteChannel() |
SeekableByteChannel |
Create a new file or open an existing file as a seekable
byte channel. (See the full discussion of NIO later in this
chapter.) Consider using FileChannelopen() as an alternative. |
newDirectoryStream() |
DirectoryStream |
Return a DirectoryStream for iterating over a
directory hierarchy. Optionally, supply a glob pattern or filter
object to match files. |
newInputStream(),
newOutputStream()
|
InputStream or
OutputStream
|
Open a file for reading via an InputStream or create and open a file
for writing via an OuputStream. Optionally, specify file
truncation for the output stream; the default is to create a
truncate on write. |
probeContentType() |
String |
Returns the MIME type of the file if it can be determined
by installed FileTypeDetector
services or null if
unknown. |
readAllBytes(),
readAllLines()
|
byte[] or List<String> |
Read all data from the file as a byte [] or all characters as a list of strings using a specified character encoding. |
size() |
long | Get the size in bytes of the file at the specified path. |
walkFileTree() |
Path |
Apply a FileVisitor to
the specified directory tree, optionally specifying whether to
follow links and a maximum depths of traversal. |
write() |
Path |
Write an array of bytes or a collection of strings (with a specified character encoding) to the file at the specified path and close the file, optionally specifying append and truncation behavior. The default is to truncate and write the data. |
With the preceding methods, we can fetch input or output streams or buffered readers and writers to a given file. We can also create paths as files and dirctories and iterate through file hierarchies. We’ll discuss directory operations in the next section.
As a reminder, the resolve()
and resolveSibling() methods of
Path are useful for constructing
targets for the copy() and move() operations.
// Move the file /tmp/foo.txt to /tmp/bar.txtPathfoo=fs.getPath("/tmp/foo.txt");Files.move(foo,foo.resolveSibling("bar.txt"));
For quickly reading and writing the contents of files without
streaming, we can use the read all
and write methods that move byte
arrays or strings in and out of files in a single operation. These are
very convenient for files that easily fit into memory.
// Read and write collection of String (e.g. lines of text)CharsetasciiCharset=Charset.forName("US-ASCII");List<String>csvData=Files.readAllLines(csvPath,asciiCharset);Files.write(newCSVPath,csvData,asciiCharset);// Read and write bytesbyte[]data=Files.readAllBytes(dataPath);Files.write(newDataPath,data);
Directory Operations
In addition to basic directory creation and manipulation
methods of the Files class, there are
methods for listing the files within a given directory and traversing
all files and directories in a directory tree. To list the files in a
single directory, we can use one of the newDirectoryStream()
methods, which returns an iterable DirectoryStream.
// Print the files and directories in /tmptry(DirectoryStream<Path>paths=Files.newDirectoryStream(fs.getPath("/tmp"))){for(Pathpath:paths){System.out.println(path);}}
The snippet lists the entries in “/tmp,” iterating over the
directory stream to print the results. Note that we open the DirectoryStream within a try-with-resources clause so that it is
automatically closed for us. A DirectoryStream is implemented as a kind of
one-way iterable that is analogous to a stream, and it must be closed to
free up associated resources. The order in which the entries are
returned is not defined by the API and you may need to store and sort
them if ordering is required.
Another form of newDirectoryStream() takes a glob
pattern to limit the files matched in the listing:
// Only files in /tmp matching "*.txt" (globbing)try(DirectoryStream<Path>paths=Files.newDirectoryStream(fs.getPath("/tmp"),"*.txt")){...
File globbing filters filenames using the familiar “*” and a few other patterns to specify matching names. Table 12-3 provides some additional examples of file globbing patterns.
| Pattern | Example |
| *.txt | Filenames ending in “.txt” |
| *.{java,class} | Filenames ending in “java” or “class” |
| [a,b,c]* | Filenames starting with “a”, “b”, or “c” |
| [0-9]* | Filenames starting with the digits 0 through 9 |
| [!0-9]* | Filenames starting with any character except 0 through 9 |
| pass?.dat | Filenames starting with “pass” plus any character plus “.dat” (e.g., pass1.dat, passN.dat) |
If globbing patterns are not sufficient, we can provide our own
stream filter by implementing the DirectoryStream.Filter interface. The
following snippet is the procedural (code) version of the “*.txt” glob
pattern; matching filenames ending with “.txt”. We’ve implemented the
filter as an anonymous inner class here because it’s short:
// Same as above using our own (anonymous) filter implementationtry(DirectoryStream<Path>paths=Files.newDirectoryStream(fs.getPath("/tmp"),newDirectoryStream.Filter<Path>(){@Overridepublicbooleanaccept(Pathentry)throwsIOException{returnentry.toString().endsWith(".txt");}})){...
Finally, if we need to iterate through a whole directory hierarchy
instead of just a single directory, we can use a FileVisitor. The
FileswalkFileTree() method
takes a starting path and performs a depth-first traversal of the file
hierarchy, giving the provided FileVisitor a chance to “visit” each path
element in the tree. The following short snippet prints all file and
directory names under the /Users/pat path:
// Visit all of the files in a directory treeFiles.walkFileTree(fs.getPath("/Users/pat"),newSimpleFileVisitor<Path>(){@OverridepublicFileVisitResultvisitFile(Pathfile,BasicFileAttributesattrs){System.out.println("path = "+file);returnFileVisitResult.CONTINUE;}});
For each entry in the file tree, our visitor’s visitFile() method is
invoked with the Path element and
attributes as arguments. The visitor can perform any action it likes in
relation to the file and then indicate whether or not the traversal
should continue by returning one of a set of enumerated result types:
FileVisitResultCONTINUE or TERMINATE. Here we have subclassed the
SimpleFileVisitor, which is a
convenience class that implements the methods of the FileVisitor interface for us with no-op
(empty) bodies, allowing us to override only those of interest. Other
methods available include visitFileFailed(), which is called if a file
or directory cannot be visited (e.g., due to permissions), and the pair
preVisitDirectory() and
postVisitDirectory(),
which can be used to perform actions before and after a new directory is
visited. The preVisitDirectory() has
additional usefulness in that it is allowed to return the value SKIP_SUBTREE to continue the traversal without
descending into the target path and SKIP_SIBLINGS value, which indicates that
traversal should continue, skipping the remaining entries at the same
level as the target path.
As you can see, the file listing and traversal methods of the NIO
File package are much more sophisticated than those of the classic
java.io API and are a welcome
addition.
Watching Paths
One of the nicest features of the NIO File API is the
WatchService, which can
monitor a Path for changes to any
file or directory in the hierarchy. We can choose to receive events when
files or directories are added, modified, or deleted. The following
snippet watches for changes under the folder
/Users/pat:
PathwatchPath=fs.getPath("/Users/pat");WatchServicewatchService=fs.newWatchService();watchPath.register(watchService,ENTRY_CREATE,ENTRY_MODIFY,ENTRY_DELETE);while(true){WatchKeychangeKey=watchService.take();List<WatchEvent<?>>watchEvents=changeKey.pollEvents();for(WatchEvent<?>watchEvent:watchEvents){// Ours are all Path type events:WatchEvent<Path>pathEvent=(WatchEvent<Path>)watchEvent;Pathpath=pathEvent.context();WatchEvent.Kind<Path>eventKind=pathEvent.kind();System.out.println(eventKind+" for path: "+path);}changeKey.reset();// Important!}
We construct a WatchService
from a FileSystem using the
newWatchService() call.
Thereafter, we can register a Watchable object with the service (currently,
Path is the only type of Watchable) and poll it for events. As shown,
in actuality the API is the other way around and we call the watchable
object’s register() method, passing
it the watch service and a variable length argument list of enumerated
values representing the event types of interest: ENTRY_CREATE, ENTRY_MODIFY, or ENTRY_DELETE. One additonal type, OVERFLOW, can be registered in order to get
events that indicate when the host implementation has been too slow to
process all changes and some changes may have been lost.
After we are set up, we can poll for changes using the watch
service take() method, which
returns a WatchKey object. The
take() method blocks until an event
occurs; another form, poll(), is nonblocking.
When we have a WatchKey containing
events, we can retrieve them with the pollEvents() method. The API is, again, a bit
awkward here as WatchEvent is a
generic type parameterized on the kind of Watchable object. In our case, the only types
possible are Path type events and so
we cast as needed. The type of event (create, modify, delete) is
indicated by the WatchEventkind() method and the
changed path is indicated by the context() method.
Finally, it’s important that we call reset() on the WatchKey object in order to clear the events
and be able to receive further updates.
Performance of the WatchService
depends greatly on implementation. On many systems, filesystem
monitoring is built into the operating system and we can get change
events almost instantly. But in many cases, Java may fall back on its
generic, background thread-based implementation of the watch service,
which is very slow to detect changes. At the time of this writing, for
example, Java 7 on Mac OS X does not take advantage of the OS-level file
monitoring and instead uses the slow, generic polling service.
Serialization
Using a DataOutputStream, you
could write an application that saves the data content of your objects one
at a time as simple types. However, Java provides an even more powerful
mechanism called object serialization that does almost all the work for
you. In its simplest form, object serialization is an
automatic way to save and load the state of an object. However, object
serialization has greater depths that we cannot plumb within the scope of
this book, including complete control over the serialization process and
interesting twists such as class versioning.
Basically, an instance of any class that implements the Serializable interface
can be saved to and restored from a stream. The stream subclasses,
ObjectInputStream and
ObjectOutputStream, are
used to serialize primitive types and objects. Subclasses of Serializable classes are also serializable. The
default serialization mechanism saves the value of all of the object’s
fields (public and private), except those that are static and those marked
transient.
One of the most important (and tricky) things about serialization is
that when an object is serialized, any object references it contains are
also serialized. Serialization can capture entire “graphs” of
interconnected objects and put them back together on the receiving end
(we’ll demonstrate this in an upcoming example). The implication is that
any object we serialize must contain only references to other Serializable objects. We can prune the tree and
limit the extent of what is serialized by marking nonserializable
variables as transient or overriding
the default serialization mechanisms. The transient modifier can be applied to any
instance variable to indicate that its contents are not useful outside of
the current context and should not be saved.
In the following example, we create a Hashtable and write it to a disk file called
hash.ser. The Hashtable object is already serializable because
it implements the Serializable
interface.
importjava.io.*;importjava.util.*;publicclassSave{publicstaticvoidmain(String[]args){Hashtablehash=newHashtable();hash.put("string","Gabriel Garcia Marquez");hash.put("int",newInteger(26));hash.put("double",newDouble(Math.PI));try{FileOutputStreamfileOut=newFileOutputStream("hash.ser");ObjectOutputStreamout=newObjectOutputStream(fileOut);out.writeObject(hash);out.close();}catch(Exceptione){System.out.println(e);}}}
First, we construct a Hashtable
with a few elements in it. Then, in the lines of code inside the try block, we write the Hashtable to a file called
hash.ser, using the writeObject() method of
ObjectOutputStream. The ObjectOutputStream class is a lot like the DataOutputStream class, except that it includes
the powerful writeObject()method.
The Hashtable that we created has
internal references to the items it contains. Thus, these components are
automatically serialized along with the Hashtable. We’ll see this in the next example
when we deserialize the Hashtable.
importjava.io.*;importjava.util.*;publicclassLoad{publicstaticvoidmain(String[]args){try{FileInputStreamfileIn=newFileInputStream("hash.ser");ObjectInputStreamin=newObjectInputStream(fileIn);Hashtablehash=(Hashtable)in.readObject();System.out.println(hash.toString());}catch(Exceptione){System.out.println(e);}}}
In this example, we read the Hashtable from the hash.ser
file, using the readObject() method of
ObjectInputStream. The ObjectInputStream class is a lot like DataInputStream, except that it includes the
readObject() method. The return type of
readObject() is Object, so we need to cast it to a Hashtable. Finally, we print the contents of the
Hashtable using its toString() method.
Initialization with readObject()
Often, simple deserialization alone is not enough to
reconstruct the full state of an object. For example, the object may
have had transient fields representing state that could not be
serialized, such as network connections, event registration, or decoded
image data. Objects have an opportunity to do their own setup after
deserialization by implementing a special method named readObject().
Not to be confused with the readObject() method of the ObjectInputStream, this method is implemented
by the serializable object itself. To be recognized and used, the
readObject() method must have a
specific signature, and it must be private. The following snippet is
taken from an animated JavaBean that we’ll talk about in Chapter 22:
privatevoidreadObject(ObjectInputStreams)throwsIOException,ClassNotFoundException{s.defaultReadObject();initialize();if(isRunning)start();}
When the readObject() method
with this signature exists in an object, it is called during the
deserialization process. The argument to the method is the ObjectInputStream doing the object
construction. We delegate to its defaultReadObject() method to do the normal
deserialization from the stream and then do our custom setup. In this
case, we call one of our methods named initialize() and, depending on our state, a
method called start().
Using a custom implementation of readObject() and a corresponding writeObject() method, we could take complete
control of the serialized form of the object by reading and writing to
the stream using lower-level write operations (bytes, strings, etc.)
instead of delegating to the default implementation as we did
before.
We’ll talk a little more about serialization in Chapter 22 when we discuss JavaBeans.
SerialVersionUID
Java object serialization was designed to accommodate
certain kinds of compatible class changes or
evolution in the structure of classes. For example, changing the methods
of a class does not necessarily mean that its serialized representation
must change because only the data of variables is stored. Nor would
simply adding a new field to a class necessarily prohibit us from
loading an old serialized version of the class. We could simply allow
the new variable to take its default value. By default, however, Java is
very picky and errs on the side of caution. If you make any kind of
change to the structure of your class, by default you’ll get an InvalidClassException when trying to read
previously serialized forms of the class.
Java detects these versions by performing a hash function on the structure of the class and storing a 64-bit value called the Serial Version UID (SUID), along with the serialized data. It can then compare the hash to the class when it is loaded.
Java allows us to take control of this process by looking for a special, magic field in our classes that looks like the following:
staticfinallongserialVersionUID=-6849794470754667710L;
(The value is, of course, different for every class.) If it finds
this static serialVersionUID long
field in the class, it uses its value instead of performing the hash on
the class. This value will be written out with serialized versions of
the class and used for comparison when they are deserialized. This means
that we are now in control of which versions of the class are compatible
with which serialized representations. For example, we can create our
serializable class from the beginning with our own SUID and then only
increment it if we make a truly incompatible change and want to prevent
older forms of the class from being loaded:
classMyDataObjectimplementsSerializable{staticfinallongserialVersionUID=1;// Version 1...}
A utility called serialver that comes with the JDK allows you to calculate the hash that Java would otherwise use for the class. This is necessary if you did not plan ahead and already have serialized objects stored and need to modify the class afterward. Running the serialver command on the class displays the SUID that is necessary to match the value already stored:
%serialverSomeObjectstaticfinallongserialVersionUID=-6849794470754667710L;
By placing this value into your class, you can “freeze” the SUID at the specified value, allowing the class to change without affecting versioning.
Data Compression
The java.util.zip package
contains classes you can use for data compression in streams or files. The
classes in the java.util.zip package
support two widespread compression formats: GZIP and ZIP. In this section,
we’ll talk about how to use these classes. We’ll also present two useful
example programs that build on what you have learned in this chapter.
After that, we’ll talk about a higher-level way to work with ZIP
archives—as filesystems—introduced with Java 7.
Archives and Compressed Data
The java.util.zip
package provides two filter streams for writing compressed data. The
GZIPOutputStream is for
writing data in GZIP compressed format. The ZIPOutputStream is for
writing compressed ZIP archives, which can contain one or many files. To
write compressed data in the GZIP format, simply wrap a GZIPOutputStream around an underlying stream
and write to it. The following is a complete example that shows how to
compress a file using the GZIP format, but the stream could just as well
be sent over a network connection or to any other type of stream
destination. Our GZip example is a
command line utility that compresses a file.
importjava.io.*;importjava.util.zip.*;publicclassGZip{publicstaticintsChunk=8192;publicstaticvoidmain(String[]args){if(args.length!=1){System.out.println("Usage: GZip source");return;}// create output streamStringzipname=args[0]+".gz";GZIPOutputStreamzipout;try{FileOutputStreamout=newFileOutputStream(zipname);zipout=newGZIPOutputStream(out);}catch(IOExceptione){System.out.println("Couldn't create "+zipname+".");return;}byte[]buffer=newbyte[sChunk];// compress the filetry{FileInputStreamin=newFileInputStream(args[0]);intlength;while((length=in.read(buffer,0,sChunk))!=-1)zipout.write(buffer,0,length);in.close();}catch(IOExceptione){System.out.println("Couldn't compress "+args[0]+".");}try{zipout.close();}catch(IOExceptione){}}}
First, we check to make sure we have a command-line argument
representing a filename. We then construct a GZIPOutputStream wrapped around a FileOutputStream representing the given
filename, with the .gz suffix appended. With this
in place, we open the source file. We read chunks of data and write them
into the GZIPOutputStream. Finally,
we clean up by closing our open streams.
Zip archives
While GZIP is simple compression format for a stream or
file, a ZIP archive is a file that is actually a collection of files,
some (or all) of which may be compressed. Writing data to a ZIP
archive file is a little more involved than simply wrapping a stream,
but not difficult. Each item in the ZIP file is represented by a
ZipEntry object. When
writing to a ZipOutputStream,
you’ll need to call putNextEntry() before
writing the data for each item. The following example shows how to
create a ZipOutputStream. You’ll
notice that it starts out with a stream wrapper just like it did when
creating a GZIPOutputStream:
ZipOutputStreamzipout;try{FileOutputStreamout=newFileOutputStream("archive.zip");zipout=newZipOutputStream(out);}catch(IOExceptione){}
Let’s say we have two files we want to write into this archive.
Before we begin writing, we need to call putNextEntry() to set the name of the file
within the archive and initialize the stream to the correct position
for it. Here we create a simple ZipEntry with just a file name. You
can set other ZIP format specific fields in ZipEntry, but most of the time, you won’t
need to bother with them.
try{ZipEntryentry=newZipEntry("first.dat");zipout.putNextEntry(entry);zipout.write(...)// Write data for first fileZipEntryentry=newZipEntry("second.dat");zipout.putNextEntry(entry);zipout.write(...)// Write data for second file...zipout.close();}catch(IOExceptione){}
Decompressing Data
To decompress data in the GZIP format, simply wrap a
GZIPInputStream around
an underlying FileInputStream and
read from it. The following example complements our earlier GZip example and shows how to decompress a
GZIP file:
importjava.io.*;importjava.util.zip.*;publicclassGUnzip{publicstaticintsChunk=8192;publicstaticvoidmain(String[]args){if(args.length!=1){System.out.println("Usage: GUnzip source");return;}// create input streamStringzipname,source;if(args[0].endsWith(".gz")){zipname=args[0];source=args[0].substring(0,args[0].length()-3);}else{zipname=args[0]+".gz";source=args[0];}GZIPInputStreamzipin;try{FileInputStreamin=newFileInputStream(zipname);zipin=newGZIPInputStream(in);}catch(IOExceptione){System.out.println("Couldn't open "+zipname+".");return;}byte[]buffer=newbyte[sChunk];// decompress the filetry{FileOutputStreamout=newFileOutputStream(source);intlength;while((length=zipin.read(buffer,0,sChunk))!=-1)out.write(buffer,0,length);out.close();}catch(IOExceptione){System.out.println("Couldn't decompress "+args[0]+".");}try{zipin.close();}catch(IOExceptione){}}}
First, we check to make sure we have a command-line argument
representing a filename. If the argument ends with
.gz, we figure out what the filename for the
uncompressed file should be. Otherwise, we use the given argument and
assume the compressed file has the .gz suffix. Then we construct a
GZIPInputStream wrapped around a
FileInputStream that represents the
compressed file. With this in place, we open the target file. We read
chunks of data from the GZIPInputStream and write them into the target
file. Finally, we clean up by closing our open streams.
Reading a ZIP archive is also the mirror of writing. When reading
from a ZipInputStream, you
should call getNextEntry() before
reading each item. When getNextEntry() returns null, there are no more items to read. The
following example shows how to create a ZipInputStream:
ZipInputStreamzipin;try{FileInputStreamin=newFileInputStream("archive.zip");zipin=newZipInputStream(in);}catch(IOExceptione){}
Suppose we want to read two files from this archive. Before we
begin reading, we need to call getNextEntry(). At the very least, the entry
gives us a name of the item we are reading from the archive:
try{ZipEntryfirst=zipin.getNextEntry();zipin.read(...)// Read the file data}catch(IOExceptione){}
Now, you can read the contents of the first item in the archive.
When you come to the end of the item,
the read() method returns -1. At this point, you can call getNextEntry() again to read the
second item from the archive. If you call getNextEntry() and it returns null, there are no more items and you have
reached the end of the archive.
Zip Archive As a Filesystem
One of the benefits of the new java.nio.file package introduce with Java 7 is
the ability to implement custom filesystems in Java. (We talked about
the File API for the NIO file package earlier in this chapter and we’ll
return to the more general NIO facilities in the next section.) Java 7
ships with one such custom filesystem implementation bundled within it:
the Zip Filesystem Provider.[35] Using the Zip Filesystem Provider, we can open a ZIP
archive and treat it like a filesystem: reading, writing, copying, and
renaming files using all of the standard java.nio.file APIs, except that all of these
operations happen inside the ZIP archive file instead of on the host
computer filesystem (as you might otherwise expect).
The key to making this possible is that the NIO File API starts
with a FileSystem abstraction that
serves as a factory for Path objects.
In our previous discussion of the NIO File API we always simply asked
for the default filesystem using Filesystems.getDefault(). This time, we are
going to target a particular custom filesystem type and destination by
constructing a special URI for our ZIP archive. (As we’ll discuss in the
networking chapters, a URI is kind of like a URL except that it can be
more abstract).
// Construct the URI pointing to the ZIP archiveURIzipURI=URI.create("jar:file:/Users/pat/tmp/MyArchive.zip");// Open or create it and write a fileMap<String,String>env=newHashMap<>();env.put("create","true");try(FileSystemzipfs=FileSystems.newFileSystem(zipURI,env)){Pathpath=zipfs.getPath("/README.txt");OutputStreamout=Files.newOutputStream(path);try(PrintWriterpw=newPrintWriter(newOutputStreamWriter(out))){pw.println("Hello World!");}}
In this snippet, we constructed a URI for our ZIP archive using
the URIcreate() method and the special
jar:file: prefix. (The Java JAR format is really
just the ZIP format with some additional conventions.) We then used that
URI with the Filesystems
newFileSystem() method to create the right kind of filesystem
reference for us. The FileSystem it
returns will perform all of its operations on entries within the ZIP,
but otherwise will behave just like we’ve seen previously. The other
argument to the newFileSystem() method
is a Map containing string properties
that are specific to the provider. In this case, we pass in the value
“create” as “true,” indicating that we want the ZIP filesystem provider
to create the archive if it does not already exist. In order to know
what properties can be passed, you’ll have to consult the documentation
for the particular filesystem provider.
In our preceding snippet, we then create a Path for a file
/README.txt at the root folder of the filesystem
and write a string to it. Because we are using try-with-resources clauses to encapsulate
opening the filesystem and writing to the file, the resources will be
automatically closed for us when the operation is complete.
Other operations proceed just as with “normal” files. For example,
we can move a file by creating a path for the existing file and a path
for the new location and then using the standard Files move() method.
// Move the filetry(FileSystemzipfs=FileSystems.newFileSystem(fsURI,env)){Pathpath=zipfs.getPath("/README.txt");PathtoPath=zipfs.getPath("/README2.txt");Files.move(path,toPath);}
The NIO Package
We are now going to complete our introduction to core Java I/O
facilities by returning to the java.nio package. The
name NIO stands for “New I/O” and, as we saw earlier in this chapter in
our discussion of java.nio.file, one
aspect of NIO is simply to update and enhance features of the legacy
java.io package. Much of the general
NIO functionality does indeed overlap with existing APIs. However, NIO was
first introduced to address specific issues of scalability for large
systems, especially in networked applications. The following section
outlines the basic elements of NIO, which center on working with
buffers and channels.
Asynchronous I/O
Most of the need for the NIO package was driven by the desire to add nonblocking and selectable I/O to Java. Prior to NIO, most read and write operations in Java were bound to threads and were forced to block for unpredictable amounts of time. Although certain APIs such as Sockets (which we’ll see in Chapter 13) provided specific means to limit how long an I/O call could take, this was a workaround to compensate for the lack of a more general mechanism. In many languages, even those without threading, I/O could still be done efficiently by setting I/O streams to a nonblocking mode and testing them for their readiness to send or receive data. In a nonblocking mode, a read or write does only as much work as can be done immediately—filling or emptying a buffer and then returning. Combined with the ability to test for readiness, this allows a single-threaded application to continuously service many channels efficiently. The main thread “selects” a stream that is ready and works with it until it blocks and then moves on to another. On a single-processor system, this is fundamentally equivalent to using multiple threads. It turns out that this style of processing has scalability advantages even when using a pool of threads (rather than just one). We’ll discuss this in detail in Chapter 13when we discuss networking and building servers that can handle many clients simultaneously.
In addition to nonblocking and selectable I/O, the NIO package enables closing and interrupting I/O operations asynchronously. As discussed in Chapter 9, prior to NIO there was no reliable way to stop or wake up a thread blocked in an I/O operation. With NIO, threads blocked in I/O operations always wake up when interrupted or when the channel is closed by anyone. Additionally, if you interrupt a thread while it is blocked in an NIO operation, its channel is automatically closed. (Closing the channel because the thread is interrupted might seem too strong, but usually it’s the right thing to do.)
Performance
Channel I/O is designed around the concept of buffers, which are a sophisticated form of array, tailored to working with communications. The NIO package supports the concept of direct buffers—buffers that maintain their memory outside the Java VM in the host operating system. Because all real I/O operations ultimately have to work with the host OS by maintaining the buffer space there, some operations can be made much more efficient. Data moving between two external endpoints can be transferred without first copying it into Java and back out.
Mapped and Locked Files
NIO provides two general-purpose file-related features not
found in java.io: memory-mapped files
and file locking. We’ll discuss memory-mapped files later, but suffice
it to say that they allow you to work with file data as if it were all
magically resident in memory. File locking supports the concept of
shared and exclusive locks on regions of files—useful for concurrent
access by multiple applications.
Channels
While java.io deals
with streams, java.nio works with
channels. A channel is an endpoint for
communication. Although in practice channels are similar to streams, the
underlying notion of a channel is more abstract and primitive. Whereas
streams in java.io are defined in
terms of input or output with methods to read and write bytes, the basic
channel interface says nothing about how communications happen. It
simply has the notion of being open or closed, supported via the methods
isOpen() and close(). Implementations of channels for
files, network sockets, or arbitrary devices then add their own methods
for operations, such as reading, writing, or transferring data. The
following channels are provided by NIO:
FileChannelPipe.SinkChannel,Pipe.SourceChannelSocketChannel,ServerSocketChannel,DatagramChannel
We’ll cover FileChannel in this
chapter. The Pipe channels are simply
the channel equivalents of the java.io
Pipe facilities. We’ll talk about Socket and Datagram channels in Chapter 13. Additionally, in Java 7 there are now
asynchronous versions of both the file and socket channels: AsynchronousFileChannel, AsynchronousSocketChannel, AsynchronousServerSocketChannel, and AsynchronousDatagramChannel. These
asynchronous versions essentially buffer all of their operations through
a thread pool and report results back through an asynchronous API. We’ll
talk about the asynchronous file channel later in this chapter.
All these basic channels implement the ByteChannel interface, designed for channels
that have read and write methods like I/O streams. ByteChannels read and write ByteBuffers, however, as opposed to plain byte
arrays.
In addition to these channel implementations, you can bridge
channels with java.io I/O streams and
readers and writers for interoperability. However, if you mix these
features, you may not get the full benefits and performance offered by
the NIO package.
Buffers
Most of the utilities of the java.io and java.net packages operate on byte arrays. The
corresponding tools of the NIO package are built around ByteBuffers (with
character-based buffer CharBuffer for text).
Byte arrays are simple, so why are buffers necessary? They serve several
purposes:
They formalize the usage patterns for buffered data, provide for things like read-only buffers, and keep track of read/write positions and limits within a large buffer space. They also provide a mark/reset facility like that of
java.io.BufferedInputStream.They provide additional APIs for working with raw data representing primitive types. You can create buffers that “view” your byte data as a series of larger primitives, such as
shorts,ints, orfloats. The most general type of data buffer,ByteBuffer, includes methods that let you read and write all primitive types just likeDataOutputStreamdoes for streams.They abstract the underlying storage of the data, allowing for special optimizations by Java. Specifically, buffers may be allocated as direct buffers that use native buffers of the host operating system instead of arrays in Java’s memory. The NIO
Channelfacilities that work with buffers can recognize direct buffers automatically and try to optimize I/O to use them. For example, a read from a file channel into a Java byte array normally requires Java to copy the data for the read from the host operating system into Java’s memory. With a direct buffer, the data can remain in the host operating system, outside Java’s normal memory space until and unless it is needed.
Buffer operations
A buffer is a subclass of a java.nio.Buffer
object. The base Buffer class is
something like an array with state. It does not specify what type of
elements it holds (that is for subtypes to decide), but it does define
functionality that is common to all data buffers. A Buffer has a fixed size called its
capacity. Although all the standard Buffers provide “random access” to their
contents, a Buffer generally
expects to be read and written sequentially, so Buffers maintain the notion of a
position where the next element is read or
written. In addition to position, a Buffer can maintain two other pieces of
state information: a limit, which is a position
that is a “soft” limit to the extent of a read or write, and a
mark, which can be used to remember an earlier
position for future recall.
Implementations of Buffer add
specific, typed get and put methods that read and write the buffer
contents. For example, ByteBuffer
is a buffer of bytes and it has get() and put() methods that
read and write bytes and arrays of bytes (along with many other useful
methods we’ll discuss later). Getting from and putting to the Buffer changes the position marker, so the
Buffer keeps track of its contents
somewhat like a stream. Attempting to read or write past the limit
marker generates a BufferUnderflowException or BufferOverflowException,
respectively.
The mark, position, limit, and capacity values always obey the following formula:
mark<=position<=limit<=capacity
The position for reading and writing the Buffer is always between the mark, which
serves as a lower bound, and the limit, which serves as an upper
bound. The capacity represents the physical extent of the buffer
space.
You can set the position and limit markers explicitly with the
position() and
limit() methods.
Several convenience methods are provided for common usage patterns.
The reset() method sets
the position back to the mark. If no mark has been set, an InvalidMarkException is thrown. The
clear() method resets
the position to 0 and makes the
limit the capacity, readying the buffer for new data (the mark is
discarded). Note that the clear()
method does not actually do anything to the data in the buffer; it
simply changes the position markers.
The flip() method is used for
the common pattern of writing data into the buffer and then reading it
back out. flip makes the
current position the limit and then resets the current position to
0 (any mark is thrown away), which
saves having to keep track of how much data was read. Another method,
rewind(), simply resets the
position to 0, leaving the limit
alone. You might use it to write the same size data again. Here is a
snippet of code that uses these methods to read data from a channel
and write it to two channels:
ByteBufferbuff=...while(inChannel.read(buff)>0){// position = ?buff.flip();// limit = position; position = 0;outChannel.write(buff);buff.rewind();// position = 0outChannel2.write(buff);buff.clear();// position = 0; limit = capacity}
This might be confusing the first time you look at it because
here, the read from the Channel is
actually a write to the Buffer and
vice versa. Because this example writes all the available data up to
the limit, either flip() or
rewind() have the same effect in
this case.
Buffer types
As stated earlier, various buffer types add get and put
methods for reading and writing specific data types. Each of the Java
primitive types has an associated buffer type: ByteBuffer, CharBuffer,
ShortBuffer,
IntBuffer, LongBuffer,
FloatBuffer, and
DoubleBuffer. Each
provides get and put methods for reading and writing its type and
arrays of its type. Of these, ByteBuffer is the most flexible. Because it
has the “finest grain” of all the buffers, it has been given a full
complement of get and put methods for reading and writing all the
other data types as well as byte.
Here are some ByteBuffer
methods:
byteget()chargetChar()shortgetShort()intgetInt()longgetLong()floatgetFloat()doublegetDouble()voidput(byteb)voidput(ByteBuffersrc)voidput(byte[]src,intoffset,intlength)voidput(byte[]src)voidputChar(charvalue)voidputShort(shortvalue)voidputInt(intvalue)voidputLong(longvalue)voidputFloat(floatvalue)voidputDouble(doublevalue)
As we said, all the standard buffers also support random access.
For each of the aforementioned methods of ByteBuffer, an additional form takes an
index; for example:
getLong(intindex)putLong(intindex,longvalue)
But that’s not all. ByteBuffer can also provide “views” of
itself as any of the coarse-grained types. For example, you can fetch
a ShortBuffer view of a ByteBuffer with the asShortBuffer()
method. The ShortBuffer view is
backed by the ByteBuffer, which means that they work on
the same data, and changes to either one affect the other. The view
buffer’s extent starts at the ByteBuffer’s current position, and its
capacity is a function of the remaining number of bytes, divided by
the new type’s size. (For example, shorts consume two bytes each, floats four, and longs and doubles take eight.) View buffers are
convenient for reading and writing large blocks of a contiguous type
within a ByteBuffer.
CharBuffers are interesting
as well, primarily because of their integration with Strings. Both CharBuffers and Strings implement the java.lang.CharSequence interface. This is
the interface that provides the standard charAt() and length() methods. Because of this, newer
APIs (such as the java.util.regex
package) allow you to use a CharBuffer or a String interchangeably. In this case, the
CharBuffer acts like a modifiable
String with user-configurable,
logical start and end positions.
Byte order
Because we’re talking about reading and writing types
larger than a byte, the question arises: in what order do the bytes of
multibyte values (e.g., shorts and
ints) get written? There are two
camps in this world: “big endian” and “little endian.”[36] Big endian means that the most significant bytes come
first; little endian is the reverse. If you’re writing binary data for
consumption by some native application, this is important.
Intel-compatible computers use little endian, and many workstations
that run Unix use big endian. The ByteOrder class
encapsulates the choice. You can specify the byte order to use with
the ByteBuffer order() method,
using the identifiers ByteOrder.BIG_ENDIAN and ByteOrder.LITTLE_ENDIAN like so:
byteArray.order(ByteOrder.BIG_ENDIAN);
You can retrieve the native ordering for your platform using the
static ByteOrder.nativeOrder()
method. (I know you’re curious.)
Allocating buffers
You can create a buffer either by allocating it
explicitly using allocate() or by
wrapping an existing plain Java array type. Each buffer type has a
static allocate() method that takes
a capacity (size) and also a wrap()
method that takes an existing array:
CharBuffercbuf=CharBuffer.allocate(64*1024);
A direct buffer is allocated in the same way, with the
allocateDirect()
method:
ByteBufferbbuf=ByteBuffer.allocateDirect(64*1024);ByteBufferbbuf2=ByteBuffer.wrap(someExistingArray);
As we described earlier, direct buffers can use operating system memory structures that are optimized for use with some kinds of I/O operations. The tradeoff is that allocating a direct buffer is a little slower and heavier weight operation than a plain buffer, so you should try to use them for longer-term buffers.
Character Encoders and Decoders
Character encoders and decoders turn characters into raw
bytes and vice versa, mapping from the Unicode standard to particular
encoding schemes. Encoders and decoders have long existed in Java for
use by Reader and Writer streams and in the methods of the
String class that work with byte
arrays. However, early on there was no API for working with encoding
explicitly; you simply referred to encoders and decoders wherever
necessary by name as a String. The
java.nio.charset
package formalized the idea of a Unicode character set encoding with the
Charset class.
The Charset class is a factory
for Charset instances, which know how
to encode character buffers to byte buffers and decode byte buffers to
character buffers. You can look up a character set by name with the
static Charset.forName() method and
use it in conversions:
Charsetcharset=Charset.forName("US-ASCII");CharBuffercharBuff=charset.decode(byteBuff);// to asciiByteBufferbyteBuff=charset.encode(charBuff);// and back
You can also test to see if an encoding is available with the
static Charset.isSupported()
method.
The following character sets are guaranteed to be supplied:
You can list all the encoders available on your platform using the
static availableCharsets()
method:
Mapmap=Charset.availableCharsets();Iteratorit=map.keySet().iterator();while(it.hasNext())System.out.println(it.next());
The result of availableCharsets() is a map because character
sets may have “aliases” and appear under more than one name.
In addition to the buffer-oriented classes of the java.nio package, the InputStreamReader and OutputStreamWriter bridge classes of the
java.io package have been updated to
work with Charset as well. You can
specify the encoding as a Charset
object or by name.
CharsetEncoder and CharsetDecoder
You can get more control over the encoding and decoding
process by creating an instance of CharsetEncoder or CharsetDecoder (a codec) with the Charset newEncoder() and newDecoder() methods. In the previous
snippet, we assumed that all the data was available in a single
buffer. More often, however, we might have to process data as it
arrives in chunks. The encoder/decoder API allows for this by
providing more general encode() and
decode() methods that
take a flag specifying whether more data is expected. The codec needs
to know this because it might have been left hanging in the middle of
a multibyte character conversion when the data ran out. If it knows
that more data is coming, it does not throw an error on this
incomplete conversion. In the following snippet, we use a decoder to
read from a ByteBuffer bbuff and
accumulate character data into a CharBuffer
cbuff:
CharsetDecoderdecoder=Charset.forName("US-ASCII").newDecoder();booleandone=false;while(!done){bbuff.clear();done=(in.read(bbuff)==-1);bbuff.flip();decoder.decode(bbuff,cbuff,done);}cbuff.flip();// use cbuff. . .
Here, we look for the end of input condition on the in channel to set the flag done. Note that we take advantage of the
flip() method on ByteBuffer to set the limit to the amount of
data read and reset the position, setting us up for the decode
operation in one step. The encode()
and decode() methods also return a
result object, CoderResult, that
can determine the progress of encoding (we do not use it in the
previous snippet). The methods isError(), isUnderflow(), and
isOverflow() on the
CoderResult specify why encoding
stopped: for an error, a lack of bytes on the input buffer, or a full
output buffer, respectively.
FileChannel
Now that we’ve covered the basics of channels and buffers,
it’s time to look at a real channel type. The FileChannel is the NIO equivalent of the
java.io.RandomAccessFile , but it
provides several core new features in addition to some performance
optimizations. In particular, use a FileChannel in place of a plain java.io file stream if you wish to use file
locking, memory-mapped file access, or highly optimized data transfer
between files or between file and network channels.
A FileChannel can be created
for a Path using the static FileChannelopen() method.
FileSystemfs=FileSystems.getDefault();Pathp=fs.getPath("/tmp/foo.txt");// Open default for readingtry(FileChannelchannel=FileChannel.open((p)){...}// Open with options for writingimportstaticjava.nio.file.StandardOpenOption.*;try(FileChannelchannel=FileChannel.open(p,WRITE,APPEND,...)){...}
By default, open() creates a
read-only channel for the file. We can open a channel for writing or
appending and control other more advanced features such as atomic create
and data syncing by passing additional options as shown in the second
part of the previous example. Table 12-4 summarizes these
options.
| Option | Description |
READ, WRITE
|
Open the file for read-only or write-only (default is read-only). Use both for read-write. |
APPEND |
Open the file for writing; all writes are positioned at the end of the file. |
CREATE |
Use with WRITE to open
the file and create it if needed. |
CREATE_NEW |
Use with WRITE to
create a file atomically; failing if the file already
exists. |
DELETE_ON_CLOSE |
Attempt to delete the file when it is closed or, if open, when the VM exits. |
SYNC, DSYNC
|
Wherever possible, guarantee that write operations block
until all data is written to storage. SYNC does this for all file changes
including data and metadata (attributes) whereas DSYNC only adds this requirement for
the data content of the file. |
SPARSE |
Use when creating a new file, requests the file be sparse. On filesystems where this is supported, a sparse file handles very large, mostly empty files without allocating as much real storage for empty portions. |
TRUNCATE_EXISTING |
Use WRITE on an
existing file, set the file length to zero upon opening
it. |
A FileChannel can also be
constructed from a classic FileInputStream, FileOutputStream, or RandomAccessFile:
FileChannelreadOnlyFc=newFileInputStream("file.txt").getChannel();FileChannelreadWriteFc=newRandomAccessFile("file.txt","rw").getChannel();
FileChannels created from these
file input and output streams are read-only or write-only, respectively.
To get a read/write FileChannel, you
must construct a RandomAccessFile
with read/write permissions, as in the previous example.
Using a FileChannel is just
like a RandomAccessFile, but it works
with ByteBuffer instead of byte
arrays:
ByteBufferbbuf=ByteBuffer.allocate(...);bbuf.clear();readOnlyFc.position(index);readOnlyFc.read(bbuf);bbuf.flip();readWriteFc.write(bbuf);
You can control how much data is read and written either by setting buffer position and limit markers or using another form of read/write that takes a buffer starting position and length. You can also read and write to a random position by supplying indexes with the read and write methods:
readWriteFc.read(bbuf,index)readWriteFc.write(bbuf,index2);
In each case, the actual number of bytes read or written depends
on several factors. The operation tries to read or write to the limit of
the buffer, and the vast majority of the time that is what happens with
local file access. The operation is guaranteed to block only until at
least one byte has been processed. Whatever happens, the number of bytes
processed is returned, and the buffer position is updated accordingly,
preparing you to repeat the operation until it is complete if needed.
This is one of the conveniences of working with buffers; they can manage
the count for you. Like standard streams, the channel read() method returns -1 upon reaching the end of input.
The size of the file is always available with the size() method. It can change if you write past
the end of the file. Conversely, you can truncate the file to a
specified length with the truncate()
method.
Concurrent access
FileChannels are
safe for use by multiple threads and guarantee that data “viewed” by
them is consistent across channels in the same VM. Unless you specify
the SYNC or DSYNC options, no guarantees are made about
how quickly writes are propagated to the storage mechanism. If you
only intermittently need to be sure that data is safe before moving
on, you can use the force() method to
flush changes to disk. The force()
method takes a Boolean argument indicating whether or not file
metadata, including timestamp and permissions, must be written (sync
or dsync). Some systems keep track of reads on files as well as
writes, so you can save a lot of updates if you set the flag to
false, which indicates that you
don’t care about syncing that data immediately.
As with all Channels, a
FileChannel may be closed by any
thread. Once closed, all its read/write and position-related methods
throw a ClosedChannelException.
File locking
FileChannels support
exclusive and shared locks on regions of files through the lock() method:
FileLockfileLock=fileChannel.lock();intstart=0,len=fileChannel2.size();FileLockreadLock=fileChannel2.lock(start,len,true);
Locks may be either shared or exclusive. An exclusive lock prevents others from acquiring a lock of any kind on the specified file or file region. A shared lock allows others to acquire overlapping shared locks but not exclusive locks. These are useful as write and read locks, respectively. When you are writing, you don’t want others to be able to write until you’re done, but when reading, you need only to block others from writing, not reading concurrently.
The no-args lock() method in
the previous example attempts to acquire an exclusive lock for the
whole file. The second form accepts a starting and length parameter as
well as a flag indicating whether the lock should be shared (or
exclusive). The FileLock object
returned by the lock() method can
be used to release the lock:
fileLock.release();
Note that file locks are only guaranteed be a
cooperative API; they do not necessarily prevent
anyone from reading or writing to the locked file contents. In
general, the only way to guarantee that locks are obeyed is for both
parties to attempt to acquire the lock and use it. Also, shared locks
are not implemented on some systems, in which case all requested locks
are exclusive. You can test whether a lock is shared with the
isShared()
method.
FileChannel locks are held
until the channel is closed or interrupted, so performing locks within
a try-with-resources statement will
help ensure that locks are released more robustly.
try(FileChannelchannel=FileChannel.open(p,WRITE)){channel.lock();...}
Memory-mapped files
One of the most interesting features offered through
FileChannel is the ability to map a
file into memory. When a file is memory-mapped,
like magic it becomes accessible through a single ByteBuffer—as if the entire file was read
into memory at once. The implementation of this is extremely
efficient, generally among the fastest ways to access the data. For
working with large files, memory mapping can save a lot of resources
and time.
This may seem counterintuitive; we’re getting a conceptually easier way to access our data and it’s also faster and more efficient? What’s the catch? There really is no catch. The reason for this is that all modern operating systems are based on the idea of virtual memory. In a nutshell, that means that the operating system makes disk space act like memory by continually paging (swapping 4KB blocks called “pages”) between memory and disk, transparent to the applications. Operating systems are very good at this; they efficiently cache the data that the application is using and let go of what is not in use. Memory-mapping a file is really just taking advantage of what the OS is doing internally.
A good example of where a memory-mapped file would be useful is
in a database. Imagine a 10 GB file containing records indexed at
various positions. By mapping the file, we can work with a standard
ByteBuffer, reading
and writing data at arbitrary positions and letting the native
operating system read and write the underlying data in fine-grained
pages as necessary. We could emulate this behavior with RandomAccessFile or FileChannel, but we would have to explicitly
read and write data into buffers first, and the implementation would
almost certainly not be as efficient.
A mapping is created with the FileChannel map() method. For
example:
FileChannelfc=FileChannel.open(fs.getPath("index.db"),CREATE,READ,WRITE);MappedByteBuffermappedBuff=fc.map(FileChannel.MapMode.READ_WRITE,0,fc.size());
The map() method returns
a MappedByteBuffer,
which is simply the standard ByteBuffer with a few additional methods
relating to the mapping. The most important is force(), which ensures that any data written
to the buffer is flushed out to permanent storage on the disk. The
READ_ONLY and
READ_WRITE constant
identifiers of the FileChannel.MapMode static inner class
specify the type of access. Read/write access is available only when
mapping a read/write file channel. Data read through the buffer is
always consistent within the same Java VM. It may also be consistent
across applications on the same host machine, but this is not
guaranteed.
Again, a MappedByteBuffer
acts just like a ByteBuffer.
Continuing with the previous example, we could decode the buffer with
a character decoder and search for a pattern like so:
CharBuffercbuff=Charset.forName("US-ASCII").decode(mappedBuff);Matchermatcher=Pattern.compile("abc*").matcher(cbuff);while(matcher.find())System.out.println(matcher.start()+": "+matcher.group(0));
Here, we have implemented something like the Unix grep command by relying on the Regular
Expression API working with our CharBuffer as a CharSequence. We’ve cheated a bit in this
example since the CharBuffer
allocated by the decode() method is
as large as the mapped file and must be held in memory. To do this
efficiently, we could use the CharsetDecoder discussed earlier in this
chapter to iterate through the large mapped space without pulling
everything into memory.
Direct transfer
The final feature of FileChannel that we’ll examine is
performance optimization. FileChannel supports two highly optimized
data transfer methods: transferFrom() and
transferTo(), which
move data between the file channel and another channel. These methods
can take advantage of direct buffers internally to move data between
the channels as fast as possible, often without copying the bytes into
Java’s memory space at all. The following example should be the
fastest way to implement a file copy in Java short of using the
built-in Filescopy() method:
importjava.nio.channels.*;importjava.nio.file.*;importstaticjava.nio.file.StandardOpenOption.*;publicclassCopyFile{publicstaticvoidmain(String[]args)throwsException{FileSystemfs=FileSystems.getDefault();PathfromFile=fs.getPath(args[0]);PathtoFile=fs.getPath(args[1]);try(FileChannelin=FileChannel.open(fromFile);FileChannelout=FileChannel.open(toFile,CREATE,WRITE);){in.transferTo(0,(int)in.size(),out);}}}
AsynchronousFileChannel
When we return to NIO in the next chapter, we will see
that network channels are types of SelectableChannel, which means that they can
be managed with a selector to poll for when the
channels are ready to be read or written and manage them efficiently
without blocking threads. File channels are not
selectable channels and most regular file operations simply block
until they are completed. This is not to say that file operations
always block until all the bytes we want are read from or written to
disk. In general, read operations may return fewer bytes than
requested and write operations may boh write fewer bytes and also may
buffer data in memory unless we use the SYNC or DSYNC open options.
But in a world where disk access can be many, many orders of magnitude
slower than in-memory operations even these partial reads and writes
may be slow enough that we do not wish to block waiting for
them.
The obvious solution is to use multithreading and coordinate our
reads and writes in a separate thread from our main logic. Java 7 has
made this easier by introducing the AysnchronousFileChannel, which is a file
channel that delegates all of its operations to a thread pool and can
report results using a Future
object or asynchronous callback. All read and write operations on
asynchronous file channels must specify the byte offset for the
operation (as there is no well-defined “current” offset into the file
at any given time). The simplest example is to write a file update in
the background without gathering results:
AsynchronousFileChannelchannel=AsynchronousFileChannel.open(path,WRITE);// Write logBuffer to the end of the file in the background, returning// immediatelychannel.write(logBuffer,channel.size());...
Here, we have constructed an AsynchronousFileChannel analogous to the way
we’d open a regular file channel. Our write happens in the background
and the write() method returns
immediately. By default, the channel will use a system default thread
pool to perform our write in the background. Alternately, we could
have supplied our own Executor
service for the thread pool as an argument to the open() call. If at some point we need to
sync up and guarantee that all data is written, we can use the
channel’s force() method to block
until all writes are complete.
A more interesting case is a read operation where we need the
bytes returned from the operation. In this case we can supply a
callback CompletionHandler object
that will push the results to us when they are ready.
AsynchronousFileChannelchannel=AsynchronousFileChannel.open(path);ByteBufferbbuff=ByteBuffer.allocate(1024);Objectattachment=...;channel.read(bbuff,offset,attachment,newCompletionHandler<Integer,Object>(){@Overridepublicvoidcompleted(Integerresult,Objectattachment){System.out.println("read bytes = "+result);}@Overridepublicvoidfailed(Throwableexc,Objectattachment){...}});
The additional argument attachment in the read call can be any
object we like, and it is simply returned to us in the callback as a
way for us to maintain any context needed to service the result. Here,
we print the number of bytes ready, which as usual may be fewer than
we requested, but at least didn’t require us to wait for them. The
other possibility illustrated here is that the read may fail, in which
case our failed() method is invoked
with the associated exception.
Scalable I/O with NIO
We’ve laid the groundwork for using the NIO package in
this chapter, but left out some of the important pieces. In the next
chapter, we’ll see more of the real motivation for java.nio when we talk about nonblocking and
selectable I/O. In addition to the performance optimizations that can be
made through direct buffers, these capabilities make possible designs
for network servers that use fewer threads and can scale well to large
systems. In that chapter, we’ll look at the other significant Channel types: SocketChannel, ServerSocketChannel, and DatagramChannel.
[34] Standard error is a stream that is usually reserved for error-related text messages that should be shown to the user of a command-line application. It is differentiated from the standard output, which often might be redirected to a file or another application and not seen by the user.
[35] The Zip Filesystem Provider is also supplied as an example along with sample source code even though it’s unclear if Oracle intends it to be a standard. But at the time of this writing, it is bundled with the JDK and JRE of Java 7 on all platforms.
[36] The terms big endian and little endian come from Jonathan Swift’s novel Gulliver’s Travels, where it denoted two camps of Lilliputians: those who eat their eggs from the big end and those who eat them from the little end.