Mig Layout
This is a layout that someone has added on to Java that does all of the things that the normal layouts don't do. It is far simpler than GridBag layout and can also be used in JavaFX as well as SWT.
(i) Miglayout and (ii) the ability to draw and interact with JPanels, are the two things that make Swing still usable and worth learning. Without these Swing should just be abandoned (IMHO)
Installing Mig Layout
Download jar files
Go to my copy of the repositories and download all 6 files in version 11.0
Download the following:
The documentation still tends to be for version 4.x, it's not being updated much.
Adding libraries
Import
You only need to import the Swing part of MigLayout. The "core" file might also be required even if we don't import it.
In your source code: import net.miginfocom.swing.MigLayout;
How it works
- It's easiest to arrange things in a grid. So figure out how many columns you'll need. Plan your grid now!
- Set the layout of your JPanel:
The MigLayout constructor can have various parameters:- --none-- :
panel.setLayout(new MigLayout()); - instructions for the whole panel:
panel.setLayout(new MigLayout("wrap 3, insets 10"));- What this does is set layout constraints.
There is only one set of "" so there are no column nor row contraints. - wrap 3 : means that there are 3 columns in the layout (it will wrap after 3 items)
- insets 10 : puts a 10 pixel space around the layout (like padding in HTML).
- debug : this is awesome! It shows exactly where the rows, columns, cells are
- gapy 20x : this would make a 20 pixel gap in the y direction (ie. between rows)
- What this does is set layout constraints.
- There are 3 possible sets of parameters:
panel.setLayout(new MigLayout("any constraints for the whole layout", "column constraints", "row constraints")); - All MigLayout instructions are separated by a comma
- --none-- :
- Useful layout commands:
- wrap : go to a new row
- span 2 : the component spans two columns. "span" means span the rest of the columns
- spany 3 : span 3 rows
- span 2 2 : span 2 rows and 2 columns
- grow : make the component fill all the space available. Normally "growx" or "growy".
- shrink :
- push :
- skip 1 : skip the next column
- split 2 : split the current cell into two. The next component goes into the second part of the current cell.
- gapbefore (gapafter, gapabove, gapbelow) n : add a gap of n pixels to this component
- align right : useful for aligning text in labels
- cell x y : Use this to position things into cells. Put numbers in for x and y coordinates.
If you do this, you won't need "wrap" or "skip" to position things - If you put two things into the same cell, it splits the cell (just like typing "split 2")
- sizegroup name : makes all objects with this sizegroup label be the same size as the largest one.
	//tag identifies the type of button and is used for ordering them
	panel.add(okBttn, "tag ok, span, split 3, sizegroup bttn");

	//sizegroups set all members to the size of the biggest member
	panel.add(cancelBttn, "tag cancel, sizegroup bttn");
	panel.add(helpBttn, "tag help, sizegroup bttn");
- You can do "docking" to make it act like BorderLayout, but you probably won't need to

JPanel p = new JPanel(new MigLayout("fill")); p.add(c1, "dock south"); p.add(c2, "dock west"); p.add(c3, "dock north"); p.add(c4, "dock north"); p.add(c5, "dock east"); p.add(c6, "dock center"); - width and height : set size of component
- wmin / wmax and hmin/hmax : set min/max size of component
- You can also add
frame.pack();before you do frame.setVisible(). This will totally ignore setSize() and resize the JFrame to the smallest size that fits everything.
Sample Code
One of the best demonstrations of MigLayout is this code. Copy it and run it.
To Do
Purpose
- To learn how to make a GUI with various Swing components (using JPanels, layout managers, radio buttons, TitledBorder, ...)
- To learn how to use Mig Layout
Do the following
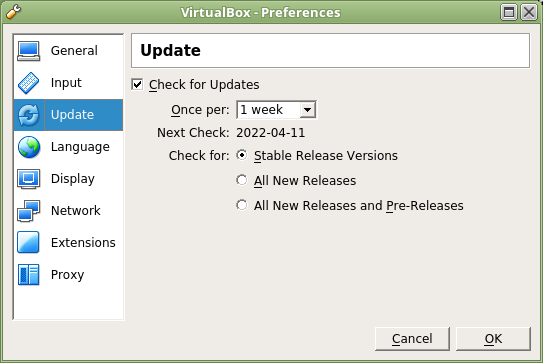
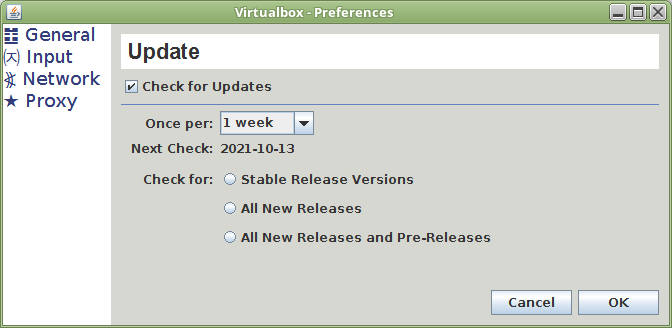
Use Mig Layout to make something similar to one of the following images:
→ You must include radio buttons that work properly (ie. only one can be selected at a time), but you don't need a TitledBorder.

|

|

|
 |
This was done with MigLayout and has DEBUG turned on. You can see that there are 3 columns. And "address" has "gapbottom 20". The two buttons are in a cell that is split and has a gap between them. |
|
Whichever one you do, please figure out how to add a TitledBorder around the radiobuttons or checkboxes
For the first layout, you'll need to make a JPanel just for the radio buttons in order to get the TitledBorder around it.
e.g. JPanel radio1 = new JPanel(new GridLayout(3,1));
Now you can add the JRadioButtons, put them in a ButtonGroup, add a TitledBorder, and then panel.add(radio1);
Repeat this for "style" and "toppings"
Please make sure that you can put radio buttons in a button group to get them to work properly.
You don't have to make it exactly like these images. Notice that the right two images don't have a lot of whitespace.
One idea is to look at a dialog / preference / settings box in some program and try to copy that.
Here are two layouts from webpages done using Bootstrap CSS. Could they be done with MigLayout? NO! It is way too hard to do this in Swing.
|
|
References
Recall that these are all really out of date; they won't have the latest features documented (whatever they are)
BUT if you are looking for the syntax and commands, and examples, follow these links and checkout at least 3 of them. Just scan quickly to see if they tell you how to do what you need to do.
- Intro: http://www.miglayout.com/
- Another intro: http://www.oracle.com/technetwork/systems/ts-4928-159120.pdf
- Examples http://jnb.ociweb.com/jnb/jnbMay2009.html
- Reference: http://migcalendar.com/miglayout/whitepaper.html
- Technical reference: http://www.migcalendar.com/miglayout/mavensite/docs/cheatsheet.html
- https://github.com/mikaelgrev/miglayout/blob/master/src/site/resources/docs/QuickStart.pdf