
 Part 5. How to secure your home linux server by routing
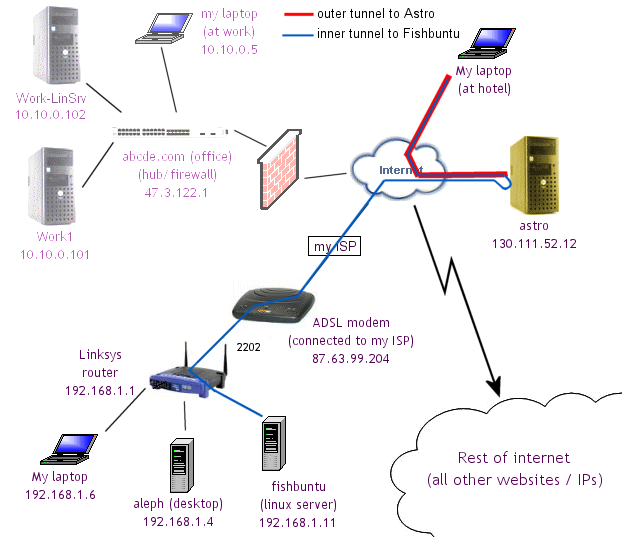
(a) Overview
In this brief section, I'll explain how to increase the security of your home server -- unfortunately, this may come at the expense of throughput.
![]() You need to have an account on another computer - e.g. at a university, so this may not apply to most people.
In this document I am calling this computer astro. Following along in the diagram
below, you can see the steps:
You need to have an account on another computer - e.g. at a university, so this may not apply to most people.
In this document I am calling this computer astro. Following along in the diagram
below, you can see the steps:
- setup up your home linux server (Fishbuntu) so that it will only accept incoming connections from one IP: astro at 130.111.52.12.
- from wherever you are in the world, make an SSH connection to Astro.
- tunnel another connection to Fishbuntu through this first connection.
- now you can do all of the normal things that you can do through an SSH tunnel.
Why is this method more secure?
- No one at the hotel, Starbucks, etc. can see where you are connecting to - except to Astro. They won't be able to tell that you are connecting to Fishbuntu
- You don't have to worry as much about having your home computers hacked. The only IP that you allow in is Astro. Someone would have to hack Astro first and then from there hack into your computer.
(b) Configuring ACL (access control lists).
This is where we restrict access to the linux server, Fishbuntu, even more. By looking at the *** lines below, we see that the only computers that are allowed to access Fishbuntu are: (a) computers on my home network (192.168.1.x), (b) my office computers, (c) the astro computer.
This acts like a firewall and means that no one can even get a password prompt for SSH unless they are using my office computers or the astro computer. This cuts out every other IP address, blocking hackers even more!
If you don't have an Astro computer equivalent, then skip this step and go on to the next document in the menu. /etc/hosts.allow will just say "ALL:ALL". This will allow you to access this computer from anywhere. It sucks -- less security, but what can you do?
| Edit hosts.allow |
| sudo vi /etc/hosts.allow # /etc/hosts.allow: list of hosts that are allowed to access the system. # See the manual pages hosts_access(5), hosts_options(5) # and /usr/doc/netbase/portmapper.txt.gz # # Example: ALL: LOCAL @some_netgroup # ALL: .foobar.edu EXCEPT terminalserver.foobar.edu # # If you're going to protect the portmapper use the name "portmap" for the # daemon name. Remember that you can only use the keyword "ALL" and IP # addresses (NOT host or domain names) for the portmapper, as well as for # rpc.mountd (the NFS mount daemon). See portmap(8), rpc.mountd(8) and # /usr/share/doc/portmap/portmapper.txt.gz for further information. # # allow localhost ALL: 127.0.0.1 # #**** allow direct connections from my office / workplace ALL: .abcde.com ALL: 47.3.122.1/255.255.255.0 # # #**** allow local network. Specify all of the computers. #ALL: 192.168.1.0 ALL: 192.168.1.1 ALL: 192.168.1.2 ALL: 192.168.1.3 ALL: 192.168.1.4 ALL: 192.168.1.5 ALL: 192.168.1.6 ALL: 192.168.1.7 ALL: 192.168.1.8 ALL: 192.168.1.9 ALL: 192.168.1.10 ALL: 192.168.1.11 ALL: 192.168.1.17 # #**** Allow Astro ALL: 130.11.52.12 |
| Edit hosts.deny |
| sudo vi /etc/hosts.deny # /etc/hosts.deny: list of hosts that are _not_ allowed to access the system. # ... ... ... # The PARANOID wildcard matches any host whose name does not match its # address. # You may wish to enable this to ensure any programs that don't # validate looked up hostnames still leave understandable logs. In past # versions of Debian this has been the default. # ALL: PARANOID ALL: ALL |
(c) SSH to Astro.
You basically just want to do this:
putty.exe -ssh -N starry@130.111.52.12 -L 2222:87.63.99.204:2203
"starry" is the login to Astro, "130.11.52.12" is Astro's IP. -N means don't open up a terminal window (you don't need one unless you plan on doing work on the Astro computer too).
A tunnel is made taking everything that is sent to port 2222 on the local machine and sending it through Astro to Fishbuntu (87.63.99.204) to port 2203. This is the only port that is open on the router.
(d) SSH through Astro to Fishbuntu
putty.exe -ssh rubio@127.0.0.1 -p 2222 -i path_to_private_key.ppk -L 1234:localhost:3128
This makes an SSH connection to port 2222 on the local machine (your laptop), which is then sent to Fishbuntu by the previous tunnel. You connect with a login name and public key authentication. Here there is a tunnel to forward port 1234 to 3128. This will send any browser requests to Squid on Fishbuntu ("localhost" in this command line) if your browser is set to use port 1234 as a proxy server. Add what ever other tunnels you need at the end of this command. You can also set up profiles in Putty to do this. To add a tunnel for VNC to connect to your desktop add -L 5900:192.168.1.7:5900