Part 8. How to access a remote printer or photocopier.
This will explain how to print from you home computer (or laptop) to a network printer at the office. A network printer is one that is plugged directly into the LAN and has its own IP address. It is not plugged into the printer port on a computer.
Alternative Method: If you don't want to follow the method outlined below, you can also print a document by connecting to a office computer using SSH and VNC, then transfer the file that you want to print to the office computer. Using VNC, you open the word processor and print the file then delete it from the office computer. This assumes that the office computer has the printer added to it. It is also a lot more work and anyone using the office computer at that time would see you trying to take it over.
Main steps:
- Find out what the IP address of the network printer is. It will be something like 10.10.200.54
- Get the file / disk that has the printer driver for the printer at the office. Make sure that it is the correct model number, etc.
- Set up the SSH tunnel. You will need to do a couple of things:
- Read over and setup remote tunnelling from the office. This is explained in section 6 of this document. It involves installing Linux on an old computer and connecting it to the network at your workplace. After you have completed this, the SSH -R connection should be re-established automatically any time it gets disconnected.
- You can test the SSH connection by trying to connect to WorkSrvLin by from home (see section 6). You won't be able to test the tunneled print connection yet.
- Add the printer to your home computer.
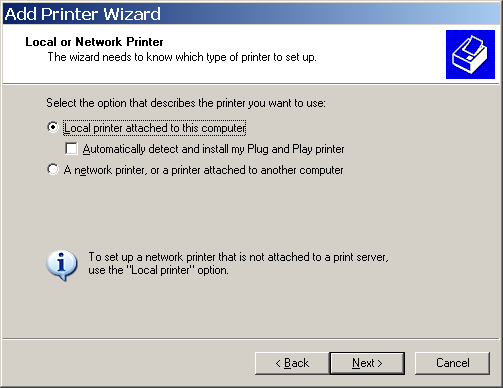
- On your desktop / laptop in WinXP go to "Add a Printer"
- Choose "Local Printer" -- see below
- Select TCP/IP port (see below)
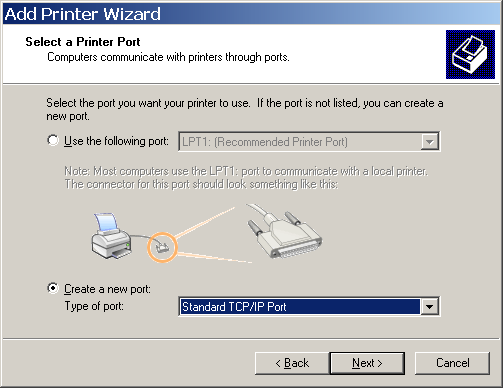
- Type in the IP address below (the standard localhost address)

- After you clicked NEXT (above) there will be a fairly long delay.
You'll then come to the screen below.
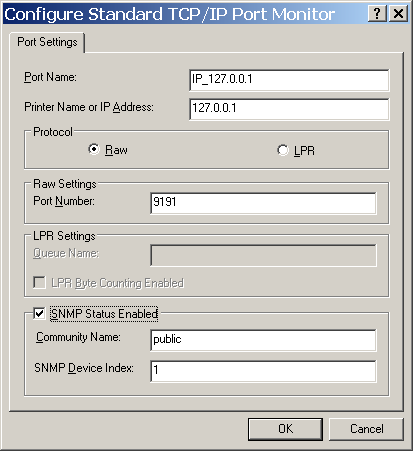
Make sure that you select Custom and then click "Settings"
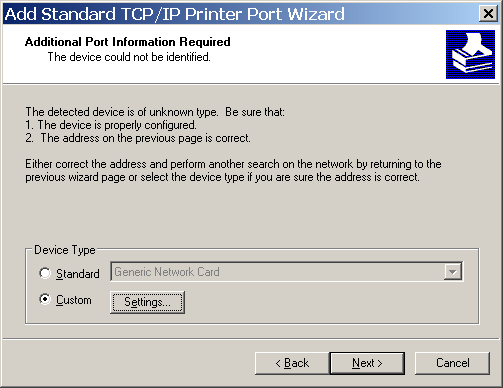
- Here you will have to change the port number to match the number
that you are using in your tunnel. You should also set the bottom
boxes up as indicated below -- however, I am not sure of their purpose.
- Once you click OK (above), you will be presented with a screen
that say ... "FINISH".
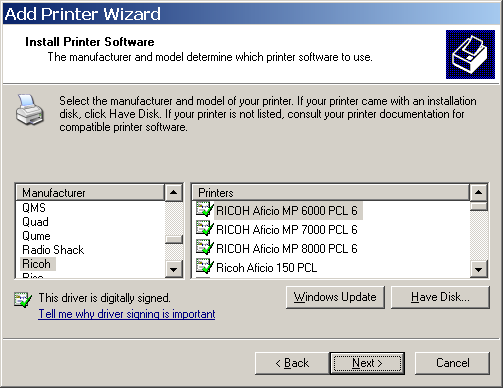
Click the Finish button. You'll then be asked to add the printer driver in a screen like this one.
Click on "Have Disk" and navigate to where you put the driver files for your office printer.
- At this point your printer is set up and ready to be tested. I would rename the printer so that it is called "SSH Ricoh" or something similar. That way it is easy to identify it as an SSH network printer.
- To print, your office server must have made an SSH -R connection to
your home server as in part 6. You now make an SSH connection from your
desktop (or laptop) to Fishuntu. Set up the tunnel so that port 9191
is tunneled to localhost:9191
(if you used the commandline it would look like this: ssh rubio@192.168.1.11 -L 9191:localhost:9191)
Then type up a document and print it - simply select "SSH Ricoh" as your printer. When you go to work, your printing will be waiting for you.
How it works: when you print on your desktop to SSH Ricoh, this goes to port 9191 on your desktop. SSH connects this port to 9191 on your Fishbuntu server. A reverse connection has been made from your office server to your home server. This connection listens for anything coming to port 9191 on Fishbuntu and transfers the data to port 9191 on 10.10.200.54 (the network printer at the office).